GoDaddy is a well-known domain registration, hosting and website building platform. But when it comes to content management, nothing can beat WordPress!
As your website grows, GoDaddy, due to its limited storage, may not support your website well. Besides, the limitation of flexibility is another major reason why you might be thinking of migrating your website from GoDaddy to WordPress. But the problem here is that GoDaddy doesn’t have any direct way to export the content. You need to migrate it manually, which makes the process critical.
However, no worries. We have bought you a stepwise guide following which you can easily do this task. So, get ready for the best experience of content management with WordPress switching from GoDaddy.
Benefits of Migrating From GoDaddy To WordPress
Below we have presented some logical ideas that will ensure migrating from GoDaddy to WordPress would be a wise decision-
Better SEO Features
WordPress offers a greater extent of search engine optimization features in comparison to the GoDaddy website builder. So, by migrating to WordPress, your website will get better reach and gather more traffic.
Wide Range of Plugins and Themes
GoDaddy has limited built-in templates and widgets. But with WordPress, you will get unlimited options for themes and plugins. Both free and paid themes and plugins are available with advanced features.
Content Ownership and Migration Possibilities
Though GoDaddy gives you content ownership, it has some restrictions when it comes to exporting content or migrating to another platform. But WordPress is quite flexible in this case. You will get complete control over it and can easily migrate it to other platforms.
Easier Content Management
WordPress is built for content management. This makes it easier to create, edit, and organize your content, whether it’s blog posts, pages, or media. Whereas GoDaddy is a hosting service that also provides content management facilities. So, no way GoDaddy can beat its performance.
Integration Flexibility
WordPress provides you extensive integration possibilities that you may lack in GoDaddy. Using WordPress, you can get easy integration into third-party services, such as email marketing platforms, analytics tools, e-commerce solutions, social media, and more. This makes your website managing and marketing easy, quick, and more effective.
Scalability
With GoDaddy, you will get limited storage. But WordPress is scalable; you can start with a simple blog and expand to a greater e-commerce site. Besides, this open-source platform has a massive and active community. This means your site will have continuous development, frequent updates, and abundant support resources.
Stepwise Guide For Migrating From GoDaddy To WordPress
Follow the below steps for migrating your GoDaddy website builder content to WordPress-
Step-1: WordPress Set-Up
The first step is to set up WordPress on your host. If you already have a blank WordPress, it is ready to receive all GoDaddy website builder content. In case you don’t have, follow the below steps-
- Choose a Hosting Provider
When running a WordPress site, having WordPress-friendly hosting is essential. It provides you features that fit the features and accessibility of WordPress elements. If you are happy with GoDaddy services, you can choose GoDaddy WordPress hosting options. Otherwise, there are many more affordable and more effective options to go for. You can choose SiteGround, Bluehost, A2 Hosting, or Hostinger.
For more detailed guidelines on selecting hosting providers for WordPress, check this- 10 Best WordPress Hosting Providers.
- Install WordPress on The New Host
After purchasing services from your hosting provider, install WordPress on the new host. Make sure to install the latest WordPress version to ensure better performance and get access to advanced features. You can do this task in two methods; these are-
- Installation With Apps
Getting into your new hostings, you will get access to its control panel- cPanel, Plesk, etc. There you will find a one-click installation option labeled “Softaculous,” “QuickInstall,” “Auto Installers,” or something similar. Clicking on this, you will find the WordPress icon, press on it for installation.
- Manual Installation
If you find installation with apps difficult, go for the manual option. Go to the official WordPress website (wordpress.org) and download the latest version of WordPress. Though this method is pretty simple, it is quite time-consuming to install apps.
Step-2: Backup All Site Files
Before making any major changes to your GoDaddy website builder content, backup it for safety. If anything goes wrong while migrating, you may lose important content, which will be bad for your website.
You can do this manually using FTP apps like FileZilla or use free tools like HTTrack. With this application, the entire content (blogs, images, web pages, and other content) will get downloaded to your computer. These processes are discussed below for your convenience-
- Backup Images and Contents Manually
If you have fewer pages in your website, you can go for manual backup. This is the most simple process to download your content without requiring much technical knowledge.
- Manual Image Backup
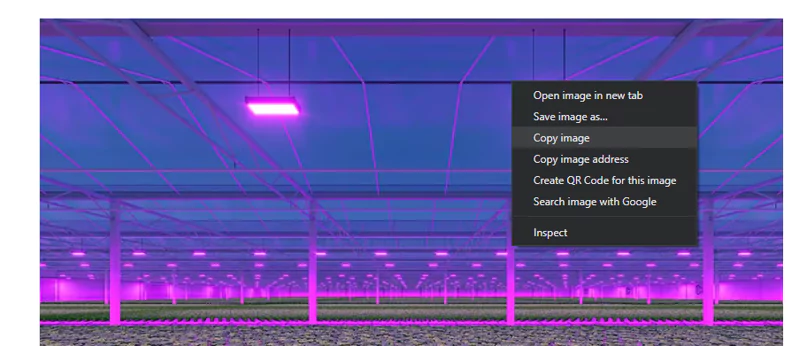
Go to your website, choose the image, right-click on it, and select the ‘Save image as…’ option. Thus, you can download the image to your computer. And later, you can upload it to your WordPress website.
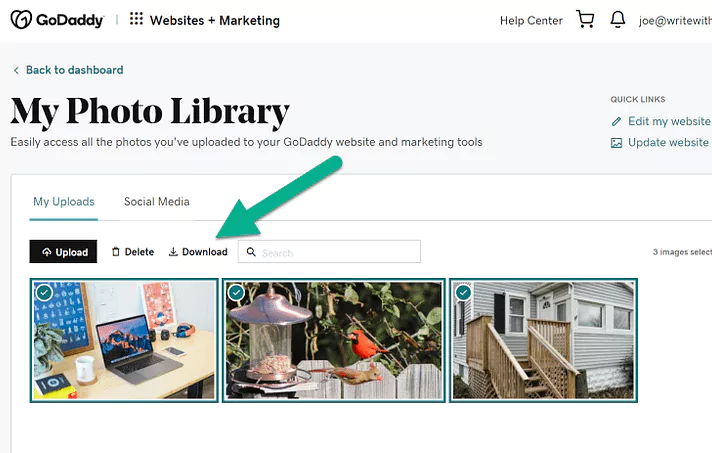
Besides you can also do this using another method by downloading all the images from the GoDaddy Photo Library. Go to the dashboard of your GoDaddy account and click on My Photos.
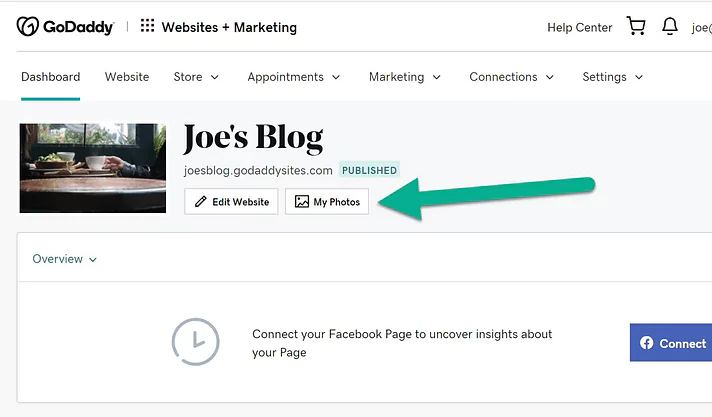
Now select all the photos from the library and click download. All the images on your website will be backed up on your computer.
- Manual Content Backup
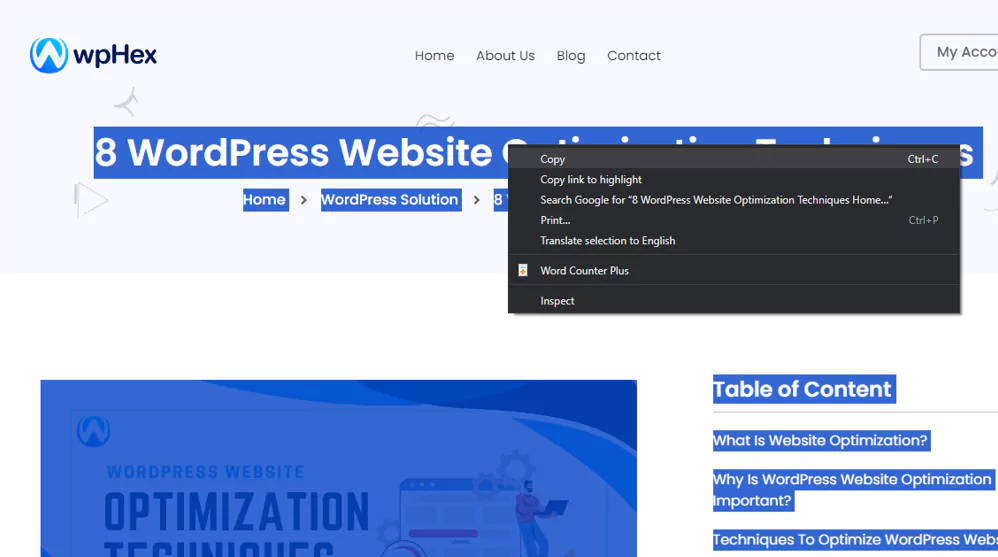
Simply, select all the content of your page and copy it with right click. You can also use Ctrl+A for selecting all and then press Ctrl+C (on windows) or Command+C (on Mac) for copying. Then paste the contents to any word file from where you can recover these to WordPress.
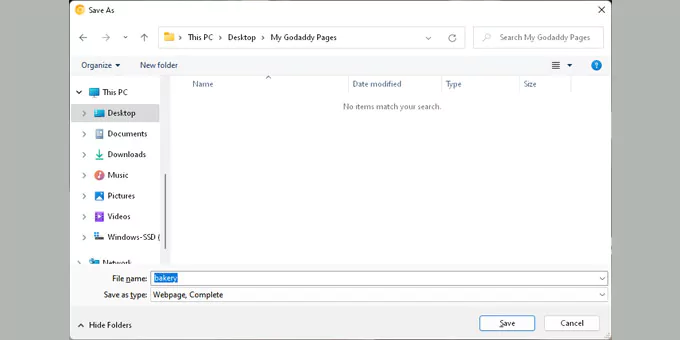
More quicker option for you is to go to your website and press Ctrl+S or Command+S (on Mac) on your keyboard. This will bring you a save dialog box. Select ‘Webpage, Complete’ in the ‘format’ or ‘save as type’ field. This will save all your content in your desktop file.
Repeat this process for all the pages. And once you are done with downloading, disconnect the internet and check the files to ensure proper downloading. This process can get messy if you have a big website. In this case choose, anyone from the below process-
- Backup Using FileZilla
FileZilla is a FTP (File Transfer Protocol) client that allows you to upload, download, and manage files between your local computer and a remote server. Using this you can backup your GoDaddy website in your computer by the following process-
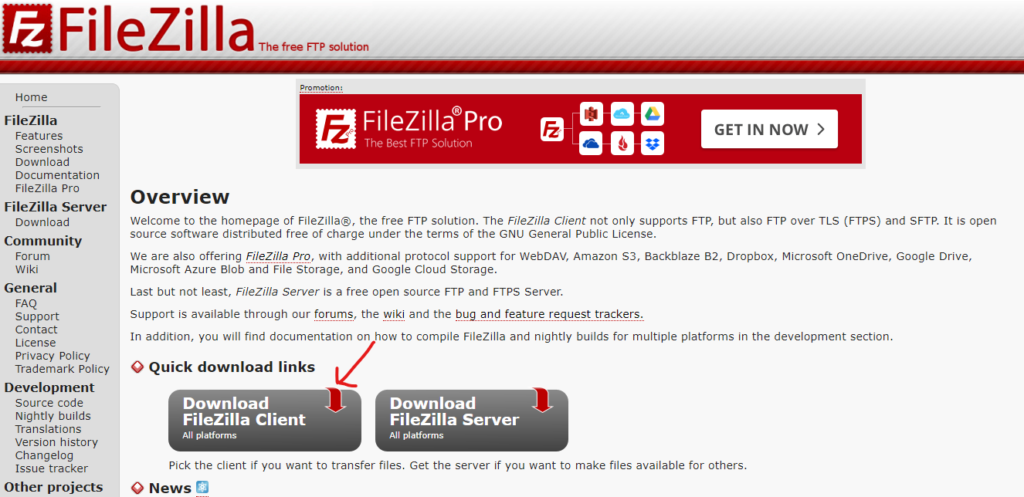
- Go to the official website of FileZilla- https://filezilla-project.org/ and install FileZilla client on your computer.
- Now, go to the hosting dashboard of your GoDaddy account. Click on the FTP or File Manager settings. There you will find an option to insert Hostname (usually an FTP server address), Username, Password, and Port (usually 21 for FTP). Give these necessary info to move to the next step.
******FTP user name should be same as your cPanel login name
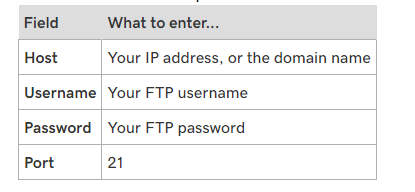
- Click to the Quickconnect and your FileZilla will connect to your hosting account.
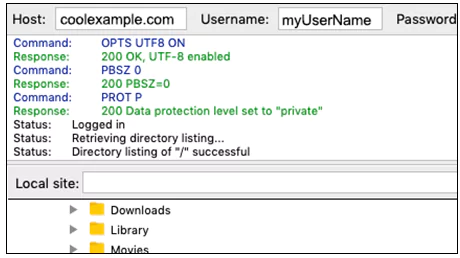
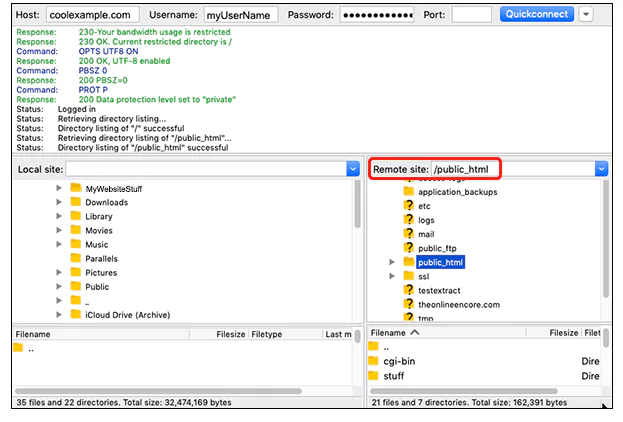
- Once connected, you’ll see two main panes- local computer to the left, and the remote server (your hosting account) to the right. Go to the remote server section and open your website’s root directory. For your main domain name the root dictionary is the public_html. But this may be different for a secondary or addon domain’s root directory.
- On the left side of the panes; local site, choose the location where you want your files to store.
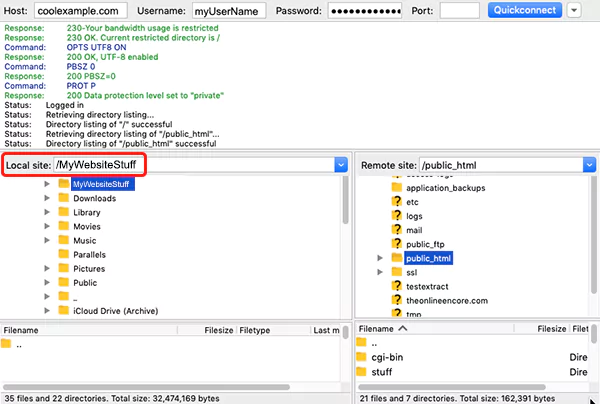
- Now select the files from the remote site that you want to download and drag them to the local site. Once these are moved, all your contents of the website will be backed up in your computer.
- Backup Using HTTrack tool
Using HTTrack tool you can download the entire website to your computer following the below process-
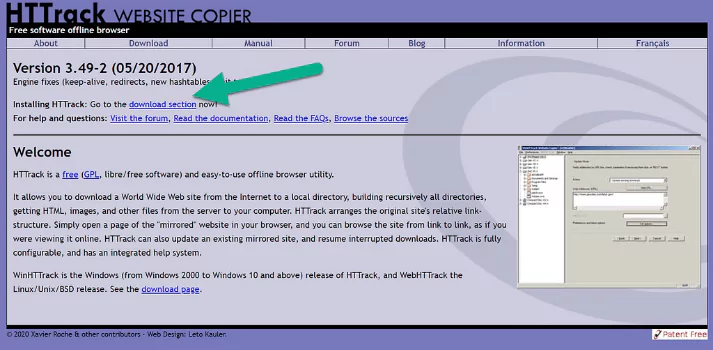
- Go to the official website of the HTTrack tool – https://www.httrack.com/ and click on the download section.
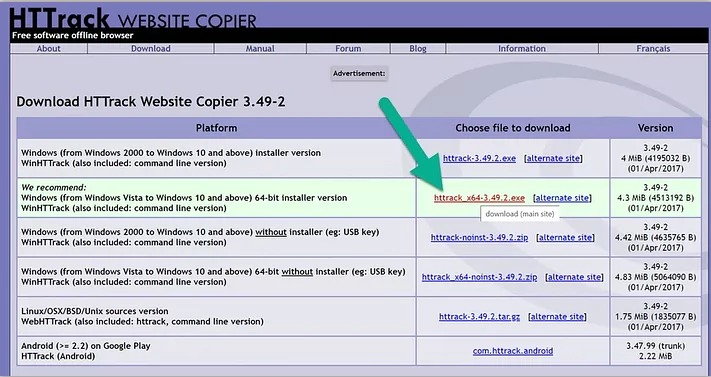
- Select the link recommended by HTTrack tool
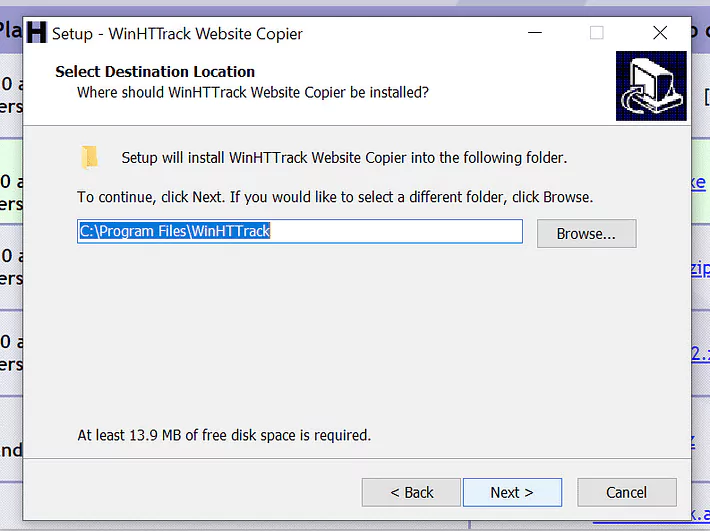
- Install the application on your computer.
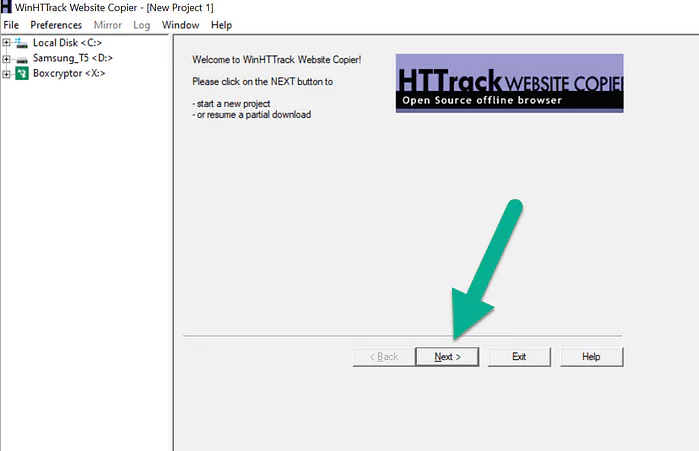
- Once you are done with the installation, open HTTrack. You will find a Next button, click on it to download your GoDaddy website’s content.
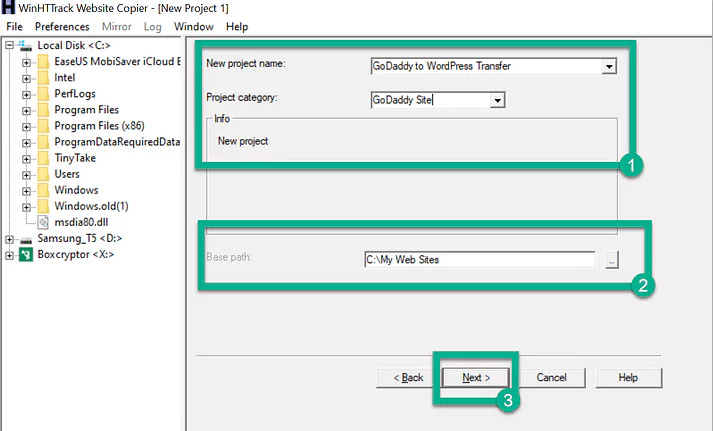
- In the next page, you will get two boxes to fill- your project name and project category. Give any name you want. The next half of the page lets you select the local folder where your website will be saved. Pick any local file that you’ll remember. After proving this info click the Next button to move on.
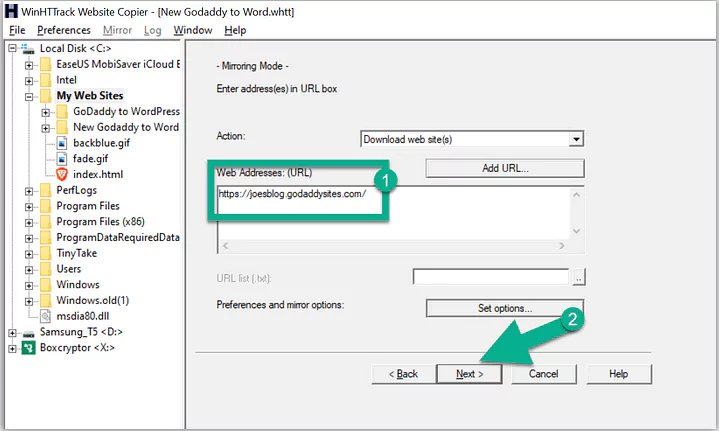
- Set the Action section to ‘Download web site(s)’ and insert the link of your GoDaddy website URL into the Web Addresses (URL) box. Then click the next button to proceed.
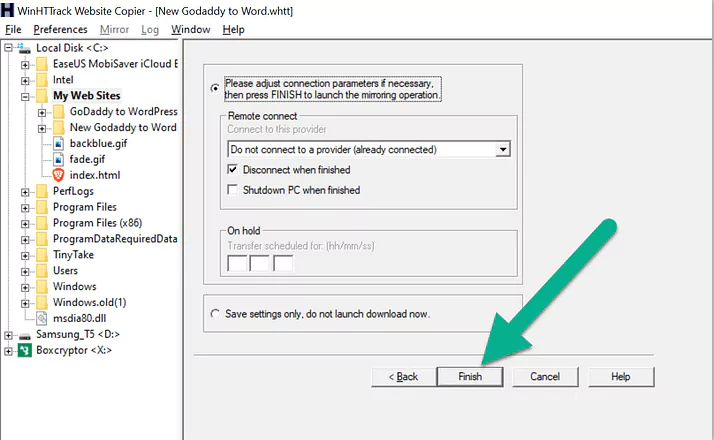
- To start downloading your GoDaddy website, click the Finish button.
- HTTrack will download the website’s files and structure to a specified folder on your computer. You can see its progress on the screen. This process may take a few minutes depending on the size of your website.
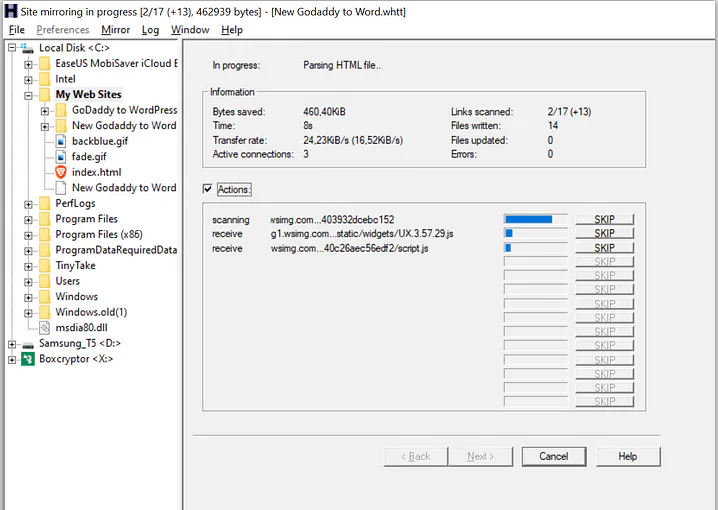
- Once all your contents are downloaded to your computer, you’ll see the file location on the left side of your screen.
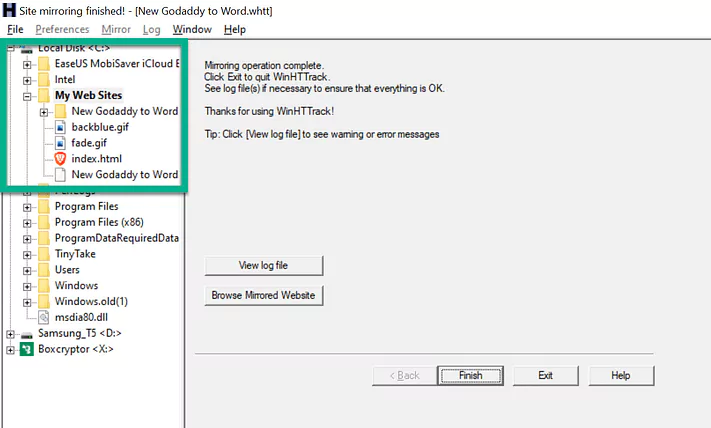
- To ensure your download is successful, go to your computer file to track its location. Interest the name of the file in the search bar, and your downloaded file will pop up.
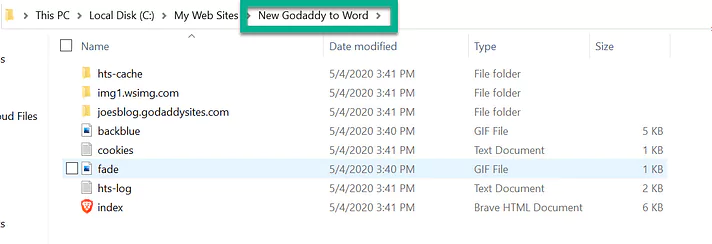
In this way you can back up your blogs and web pages. But one of the major drawbacks with HTTracker is that it may not download all images. For this case, you need to backup them manually.
Step-3: Import Content To WordPress Posts and Pages
After you have backed up all your website contents, it’s time for the most crucial step. That is migrating your GoDaddy contents to WordPress. But the sad news here is, GoDaddy has no direct export option. And WordPress also lacks an import tool for GoDaddy. So, you need to do this step manually. However, the steps are easy but can be a bit time consuming. All you need to do is copy the contents of GoDaddy to your WordPress Posts & Pages.
N.B: Here you should know the difference between post and pages as it may affect the layout of your content while migrating. Post refers to the blogs and articles. Whereas pages means the static contents that don’t change; for example- About Us or Contact.
Now, lets check the process of importing contents to wordPress-
- Adding Blog Posts To WordPress
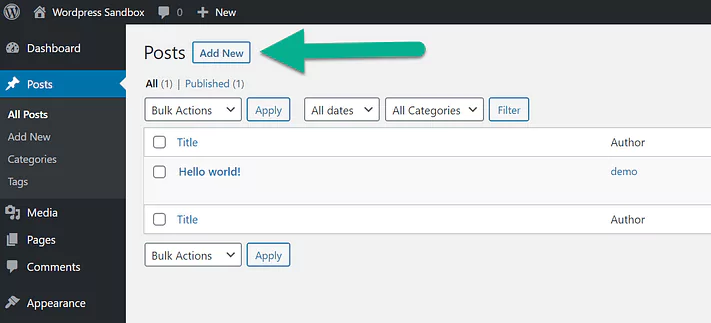
- Go to the WordPress dashboard and click on Posts → Add New.
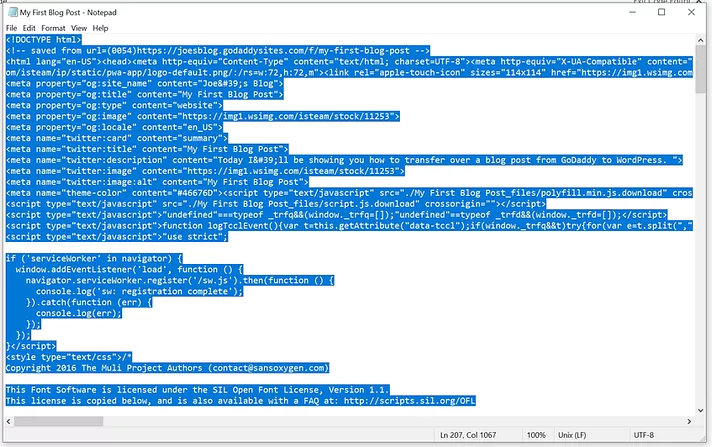
- Now go to the blog post files of your computer that you have saved from GoDaddy through Filezilla or HTTrack tool. Copy the code and move to the next step.
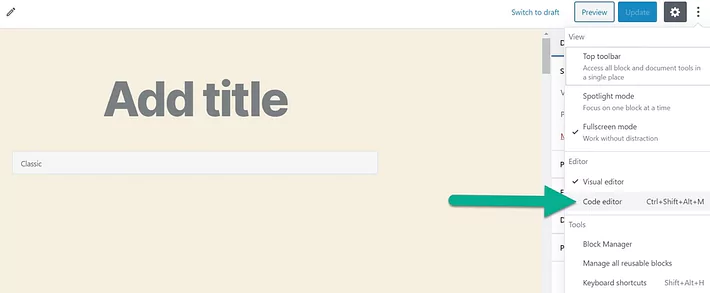
- Go to the WordPress post editor and you will find three dots in the top right corner of your screen. Click on it and switch the view to Code Editor.
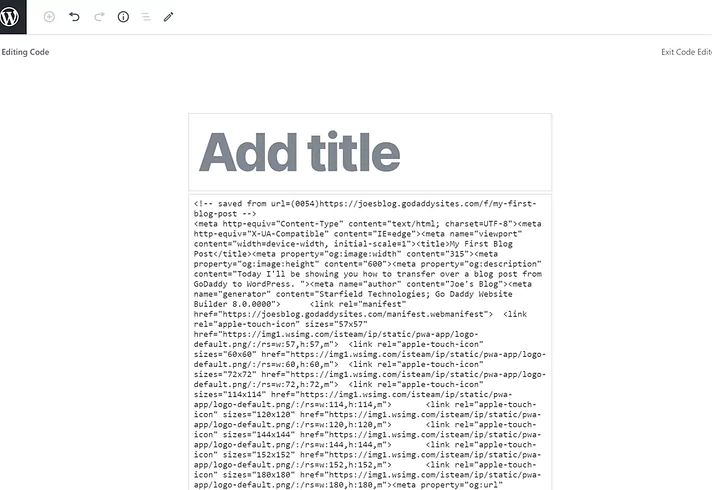
- In this WordPress code editor, paste the content you copied earlier.
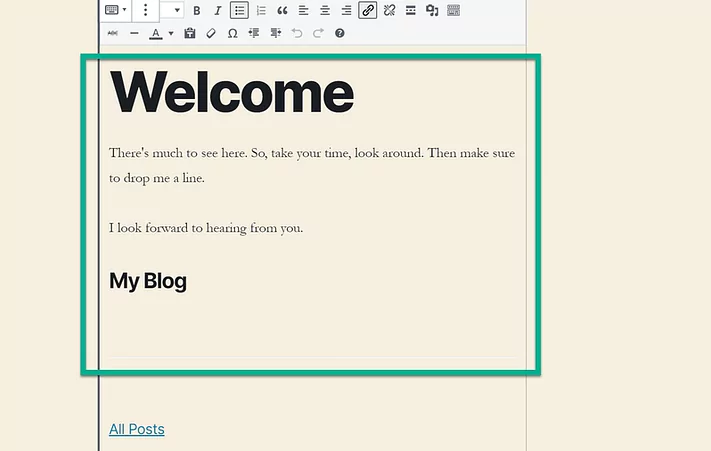
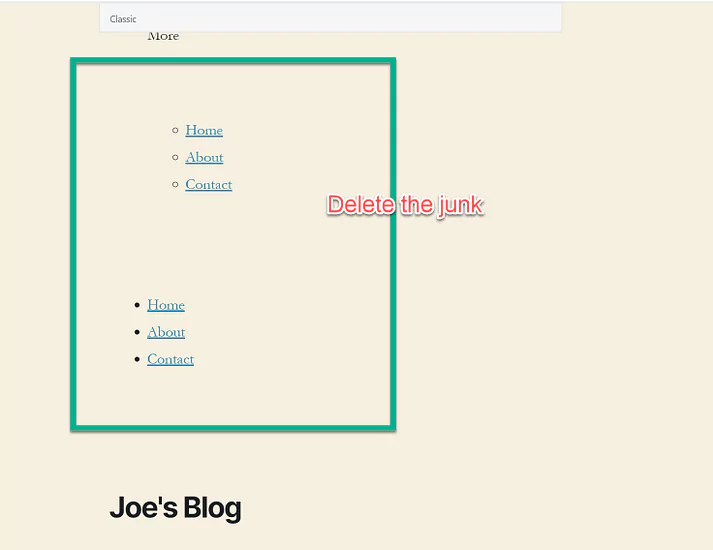
- Now move back to the Visual Editor to check if the content is copied properly. Here you may find many unwanted junk from GoDaddy; simply delete them.
- The concerning fact here is, the image will not be transferred here. For this you will need to upload the image individually to WordPress. In the previous step, you have already downloaded the images to your computer. Simply, insert them in this page and the image will be added

- Adding Pages To WordPress
- Adding pages to WordPress is similar to adding posts. First add a new page in your WordPres by clicking Pages → Add New. Choose the code editor just you did before in post adding.
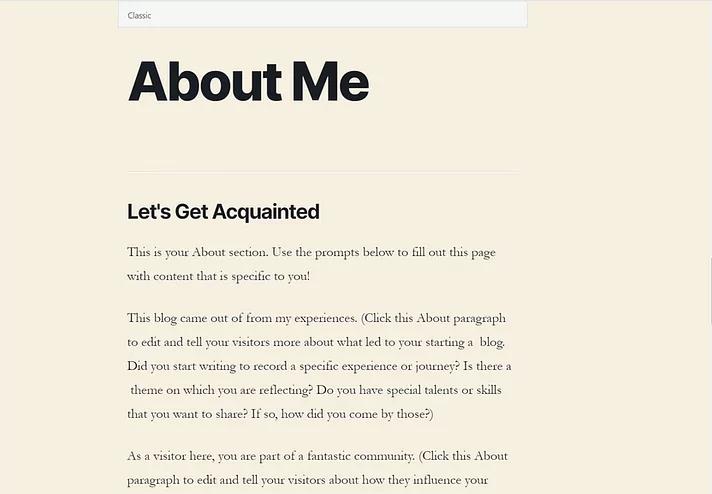
- Now, go to the files that you downloaded to your computer via HTTracker or Filezilla and select a static content. For example- About Us Page.
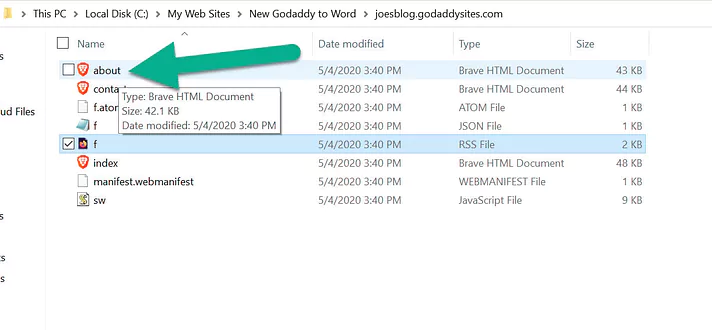
- Open the file, copy the code and paste it to the code editor. Now switch to visual editor mode to check if it’s ok.
- Delete the unnecessary addition to your page.
- Publish The Added Post and Pages
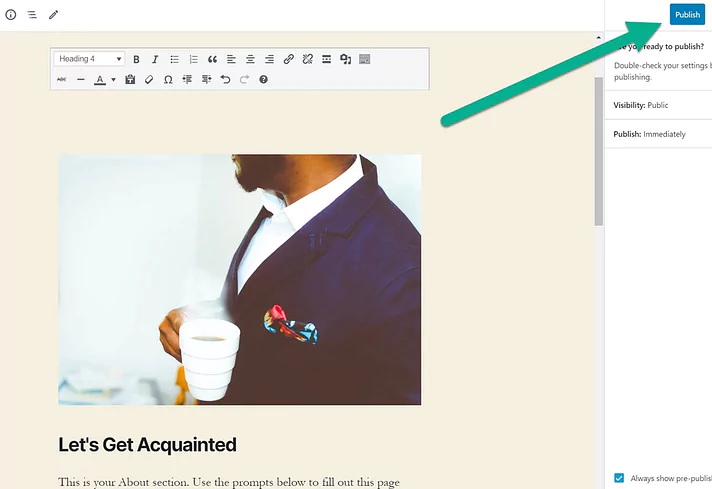
Once you have migrated all the posts, pages, and images to your WordPress from GoDaddy, publish it. You will find the Publish button on the top right-most corner of the screen. Press on it and your site will go live.
Step-4: Configure WordPress
It is essential to match the URL of your WordPress blog post to the GoDaddys’ URL. If you skip this fact, your links may not work. So, if you want to keep up with the SEO of your website and don’t wanna lose traffic, follow the below steps-
- Domain Transfer
You need to transfer the GoDaddy Domain Nameserver (DNS) to your new WordPress host. But here, the problem occurs if you get the domain name for free from the GoDaddy Website Builder plan. In this case, you won’t be able to transfer it before one year of purchasing the plan. But forwarding is possible if you have bought it separately. This is how you can change the DNS on GoDaddy-
- Go to the GoDaddy Account and click on the DNS button of the domain that you want to change.
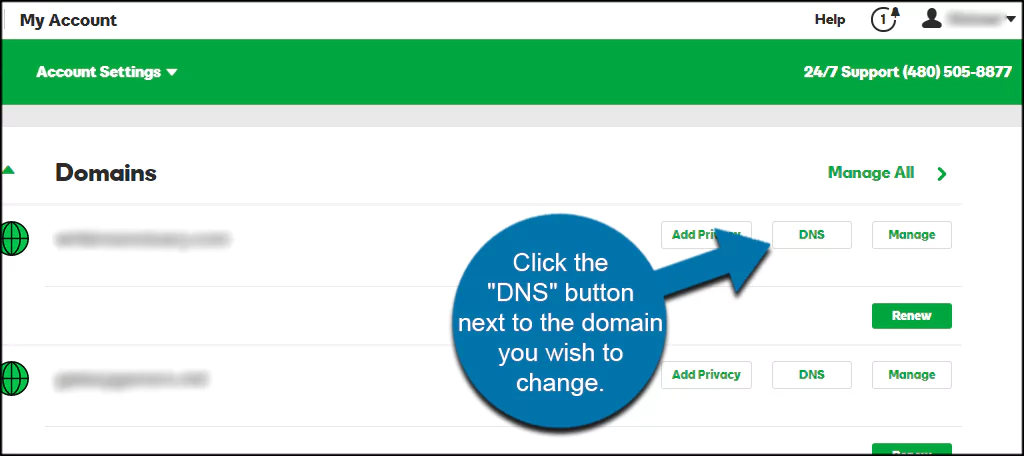
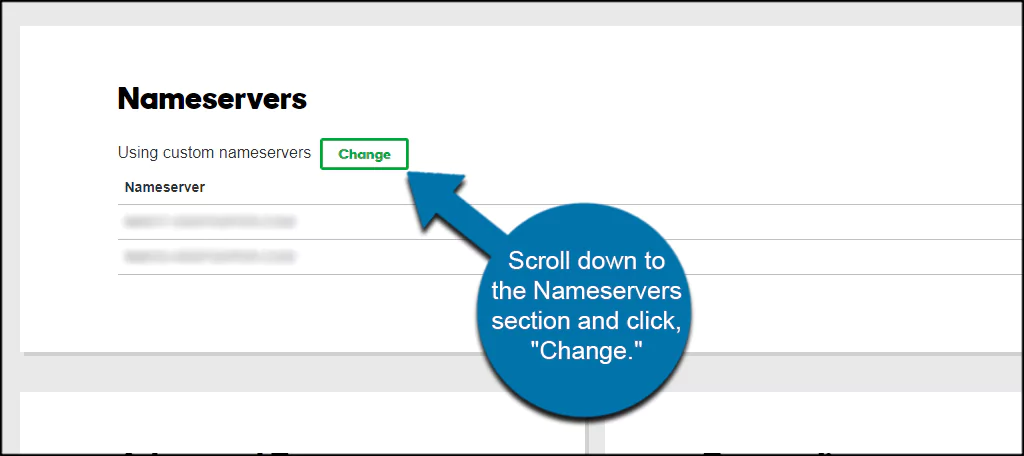
- Scrolling down, you will find a Nameservers section. Click on the Change button.
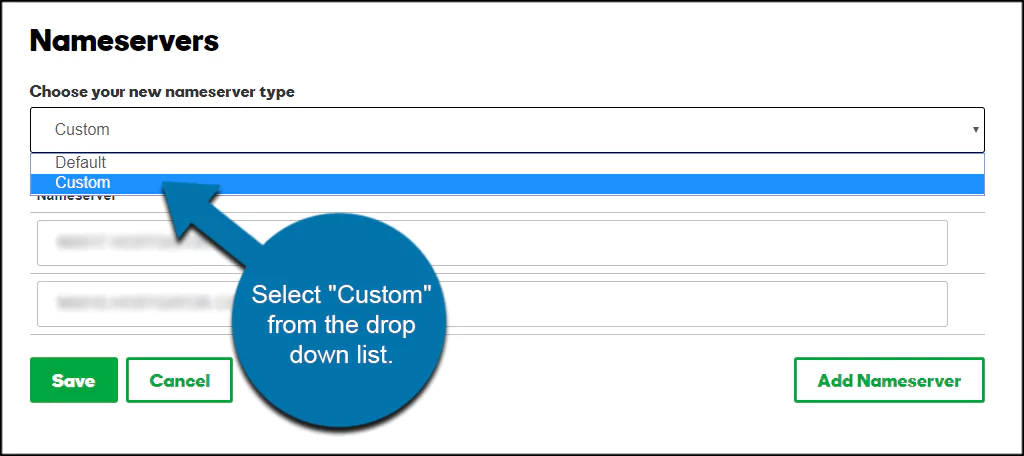
- Press on the dropdown sign, and you will find two options- Default and Custom. Choose Custom.
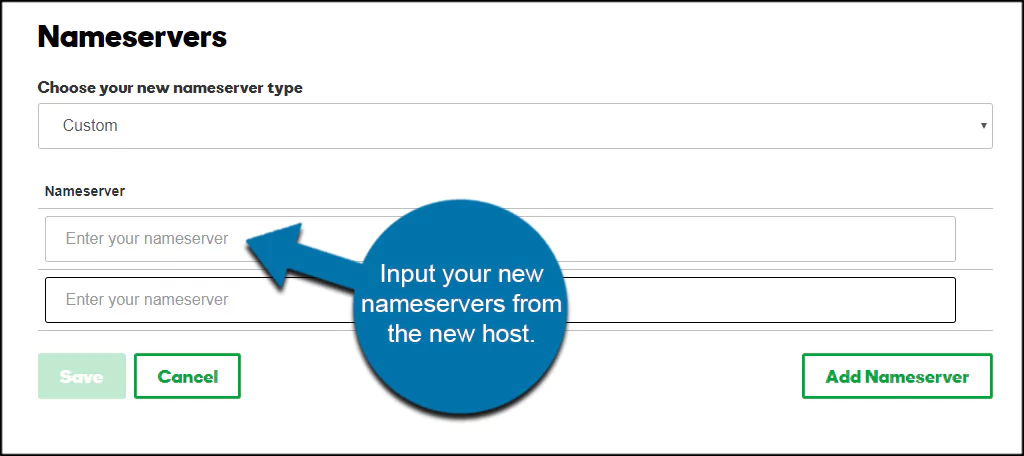
- Now enter the new server name of your new WordPress host.
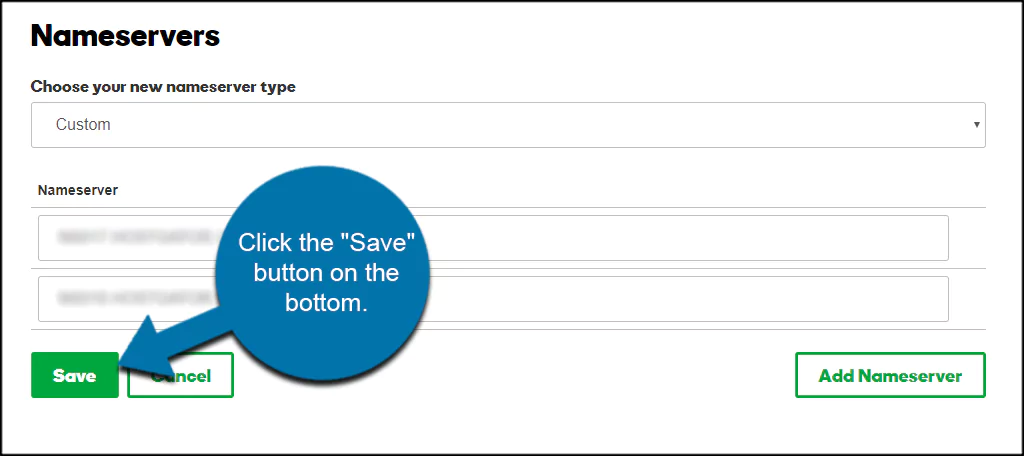
- Click the save button, and your domain name will be transferred.
NB: It may take 10 minutes to 24 hours for the process. So, you may not see any changes until the next day; keep this fact in mind.
- Permalinks
To define your URL and match the structure of your WordPress, you must ensure you have well-structured permalinks.
- Go to the WordPress dashboard and click permalink settings.
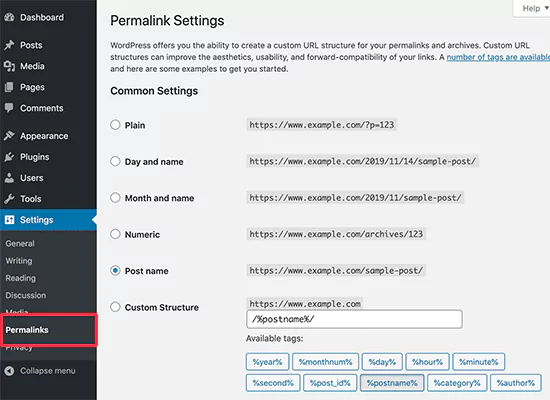
- Under the common settings, you will find numerous options; click on Post name. This will match all your links to the GoDaddy website.
- Redirect The Existing Links
Your existing website in GoDaddy may have many links that need to be redirected to the new WordPress site. For this process, you can use plugins like All in One SEO or Simple 301 Redirects.
- Using All in one SEO:
All in one SEO comes with a free and a pro (paid) version. To get access to the redirecting features, you need to purchase the pro plan. Here is the process to redirect links using this plugin-
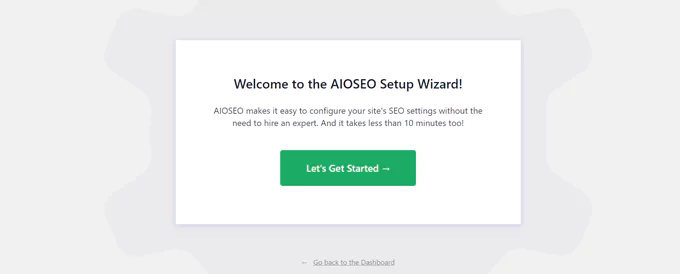
- Activate All in one SEO and continue for general set up.
- Go to the dashboard and select Redirects. You will find two options- Source URL and Target URL. Insert the old URL to Source URL and the new URL to the Target URL. Then click Save.
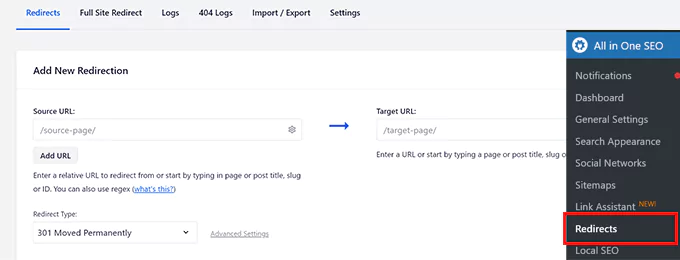
This way you can redirect all your links. Besides, this plugin offers you a ‘Redirect Manager’ feature. This allows you to track the number of times your old URLs are redirected to the new one.
- Using Simple 301 Redirects
The process of redirecting with Simple 301 Redirects is quite similar to the above. You need to activate the plugin and then go to Redirects. Here you will need to place the old URL to Request and the new URL to Destination. Lastly, click on the save change, and it’s done!
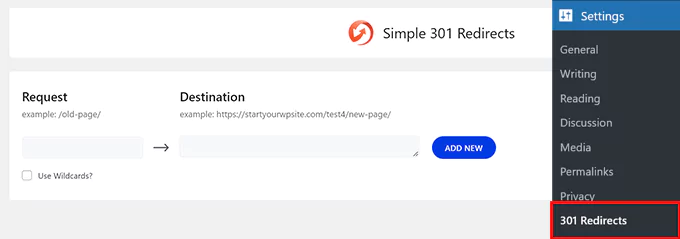
You can also use other 301 redirect plugins like- Eggplant 301 Redirects or some other options. But make sure all the plugins are compatible with WordPress.
- 404 Page
If your 301 redirect shows any issues, be sure to create a 404 (Page Not Found). This will provide necessary info and navigation options to the visitor. You can create a 404 page using WordPress plugins like- Custom 404 Pro and All 404 Redirect.
Step-5: Set Up Themes and Plugin
WordPress has wonderful themes and plugins that will take your website’s visuals, user-friendliness, and management to the next level. As you have migrated from GoDaddy, try to match the old theme to the new one. This will not confuse your customers.
However, for plugins, you will get some amazing options to make your website management quick and simple. Check the below links to get the best plugins-
- Best WordPress Cache Plugins
- Best WordPress Popup Plugins
- Best WordPress Backup Plugins
- Best WordPress Form Plugins
- Best WordPress Security Plugins
- Best WordPress FAQ Plugins
- Best WordPress Membership Plugins
Step-6: Test and Review
Once the migration is complete, ensure the website is responsive. For this, check the outline of the website on different sizes of screens, laptops, mobile, desktops, etc. Besides, check if all the sites are functioning properly. If you find any issues, take action immediately.
Step-7: Cancel GoDaddy Services
After completing your migration process, the final step is to delete the GoDaddy account. For this, go to your GoDaddy account tab and select My Product.
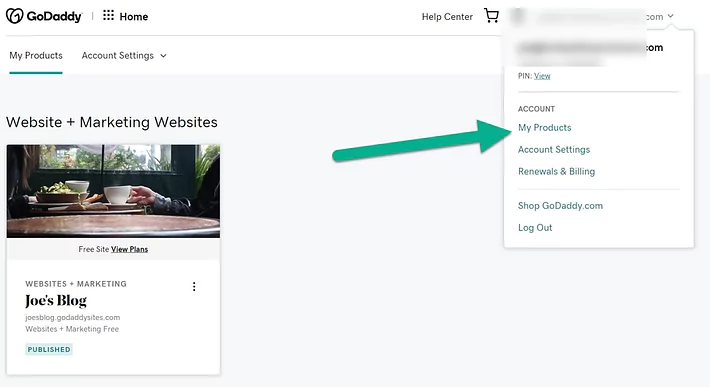
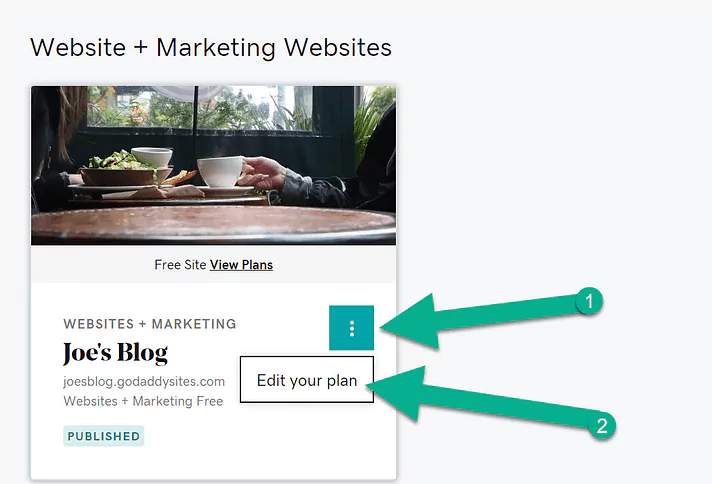
Go to the location of the website, select the settings button with three dots, and select the Edit Your Plan button.
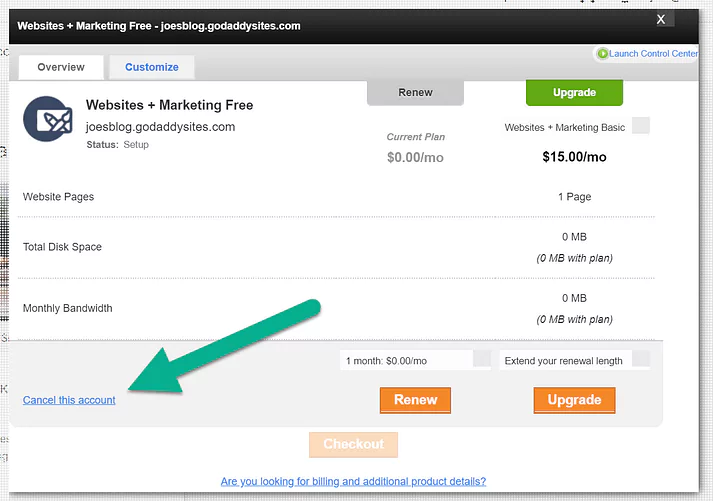
Finally, press the cancel this account option in the bottom left corner. Your GoDaddy website account will be deleted.
Thus, your GoDaddy account will migrate entirely to WordPress successfully!
The Closing Lines
WordPress offers better website building, customizing, and maintenance facilities than GoDaddy. So, once you have migrated your website to WordPress, we guarantee you a better experience. But the process doesn’t end here. You should focus on WordPress website optimization to get better results. For that, go through this article- 8 WordPress Website Optimization Techniques. Optimizing your WordPress website following this guide, you will get more enhanced performance than the previous GoDaddy website.
Related Article
Migrate From Django to WordPress

