Are you running a Blogger website and looking for a better content management facility? Migrate from Blogger to WordPress ASAP! This will not only help you with website management but also assist with better SEO and scalability.
The migration procedure is quick and simple thanks to Bloggers built-in backup tool. However, there are some manual steps that you need to go through to import the pages to WordPress. Apart from all this, after migration, you will also need to fix the permalink and redirect the Blogger website to WordPress.
We have discussed all these steps in this article in detail. So, go through the article and migrate from Blogger to WordPress with ease-
Why Migrate From Blogger To WordPress?
Before migrating from Blogger to WordPress, you should check if the decision is wise enough. Here, we have listed some logical points to emphasize why you should think of switching the platform to WordPress:
More control over your site: Blogger limits you to Google’s infrastructure and policies. But with WordPress, you will get complete control over the ownership of your site.
This is a self-hosted platform where you can choose your hosting and domain name. As a result, migrating to WordPress will give you greater flexibility in design, functionality, and content management.
SEO Benefits: WordPress is undoubtedly better than Blogger in terms of SEO. It has numerous SEO-friendly plugins and themes to help your website rank on the search engine.
Besides, running the website in managed WordPress hosting gives you additional benefits.
Better Content Management: With WordPress, you will get a better content management system (CMS) than Blogger. It allows you to arrange your content based on category tags and offers custom post-type facilities.
Besides, you can also set publication dates. This makes content management much easier for you.
Customization Facility: Both Blogger and WordPress offer customization facilities. Yet, Blogger is limited to some basic themes and plugins, which can restrict your design and functionality flexibility.
In contrast, WordPress has many free and premium themes and plugins. This allows you to customize your website design fully. Moreover, you can add any feature you like using plugins.
Scalability: Blogger is a basic blogging platform. You can post your blogs regularly here. But it may not provide the essential feature when it comes to a large project or examining your website, for instance, converting it to a digital store.
Here, WordPress wins the race. You can scale your business to a larger extent with WordPress. Doesn’t matter how extensively you are growing; WordPress is always there for you.
Data Portability: Exporting your content from Blogger to another platform can be challenging. There are chances of losing some formatting and data during the migration. But no worries with WordPress.
It provides easy tools for importing and exporting content. Besides, you will find numerous plugins for this task that make migrating to another hosting service or platform easier.
Better Monetization Options: WordPress offers more monetization options than Blogger. With Blogger, you can monetize your blog with Google AdSense and affiliate marketing. But WordPress opens the doors for selling products, memberships, and more.
Community and Support: Blogger has a small and less active community base. So, in your needs, you may not find abundant resources. In contrast, WordPress has a vast community.
You will find every solution to your issues quickly, whether from forums, documents, or tutorials. Besides, it has an active group of developers, designers, and users.
Migrate From Blogger To WordPress: Stepwise Guidance
To get more control over your website, below we have added an effective guideline for switching your Blogger site to WordPress. Go through the steps and quickly migrate your website:
Pre Migration
Before going straight to the migration process, you need to set up a suitable hosting and domain name for WordPress. These are discussed below-
1. Select A Hosting Service & Domain Name
As you are moving to a self-hosted WordPress, you first need a WordPress-friendly hosting service. There are several managed WordPress hosting services available.
The benefit of using these hosting is that they are specialized for WordPress. So, with these hosting, you will get a better SEO facility and plugin compatibility.
Here are some tips for choosing the best WordPress hosting service:
- Look for WordPress hosting with 99.99% uptime or more.
- WordPress plugin compatibility.
- Better ratings and reviews.
- Speed optimization.
- Automatic update and backup.
- Malware scanning, firewalls, and automatic security updates.
If you are looking for a reliable option, go for any of these- SiteGround, Bluehost, Namecheap, Kinsta, WP Engine. To learn more, check out this-10 Best WordPress Hosting Providers.
The hosting will offer you a free domain name. Using this, you can migrate your Blogger site to WordPress. And later, you can point the Blogger domain to it. We will discuss this procedure later.
2. Install WordPress
Managed WordPress hosting usually have a pre-installed WordPress ready for your launch. Yet, If you don’t find this option, no worries. There is surely a one-click installation solution.
Go to the hosting control panel for a quick software installer like Softaculous. From there, you can quickly install WordPress.
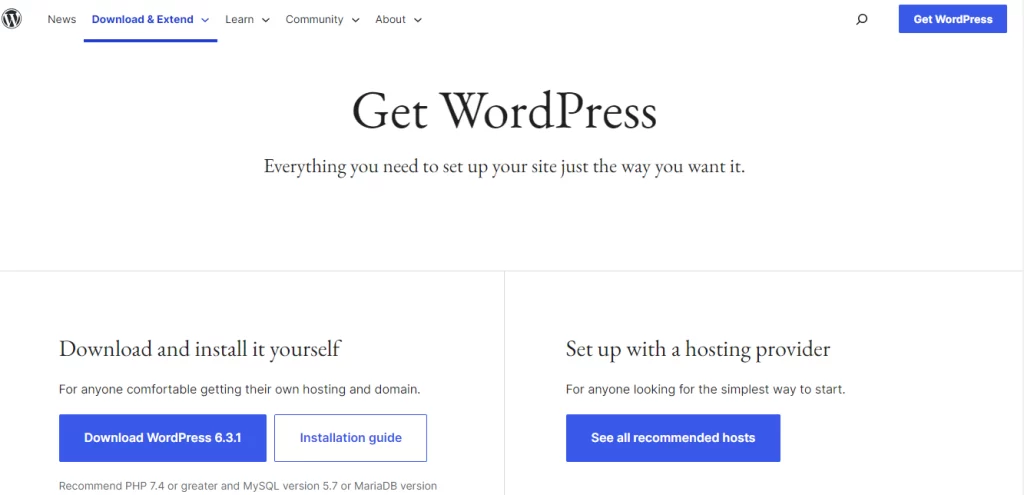
However, if you don’t want to get into this hosting navigation panel, simply go to Google and search ‘Download WordPress.’
It will take you to the official website of WordPress, from where you can download the latest version and move to the next procedure to migrate your old site to WordPress.
If you get confused with the installation process, there is an installation guide beside the download option. This will help you with the procedure.
Migration Process
Once you have installed WordPress, you have a platform where you can migrate your Blogger posts, pages, images, comments, and other content. Here is the process to follow-
1. Post Migration
The good news is that Blogger has a backup tool that allows you to download a duplicate copy of your full website. These backups are available in.xml format.
It is a relief to have a big website with bulk post-import. Using this tool, you can easily export all the posts from Blogger and then import them to WordPress. Here is how to do this:
1.1 Exporting Posts From Blogger

Log in to your Blogger website, go directly to the dashboard, and navigate to the Settings tab. You will get a field as ‘Import & back up.’
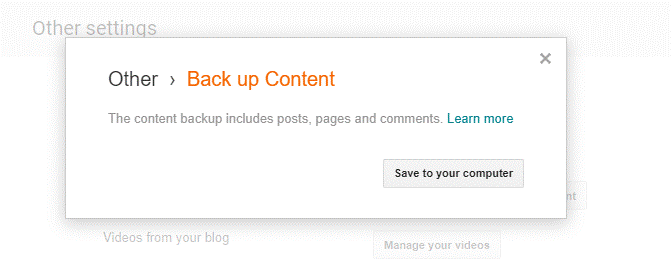
Under the field, there is a content (pages, posts & comments) option. Just check left to this text; you will find two buttons, ‘Import Content’ and ‘Back up Content.’ Click on the later one, that is the ‘Backup Content’ button.
Next, you will find a pop-up where Blogger will ask you if you want to save the backup file to your computer. Click on the ‘Save to your computer’ button to process. At once, the process will begin, and you can see the progress on the screen.
It won’t take much time at all, even if it is a large file. Just wait for a few monuments, and the file will be downloaded. Note where the .xml file is saved on your computer; this will help you in the next step.
| NB: Though the Blogger backup tool claims to download all the posts, pages, and comments, it will only export your posts and comments. You will need to export pages separately; we will discuss it below. |
1.2 Importing Posts To WordPress
After exporting the posts and comments from Blogger, it’s time to import them to WordPress. Go to the WordPress dashboard and navigate to Tools > Import tab. At the top of the page, you will find a Blogger option. Click on the ‘Install Now’ button, and WordPress will install the plugin for you.
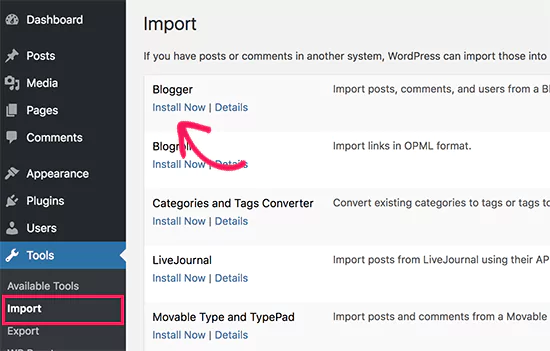
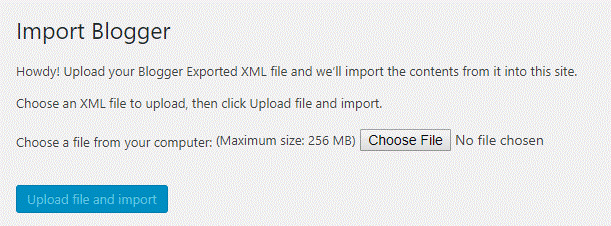
It will take a few seconds to install. After the installation, you will find a ‘Run Importer’ option under Blogger. Click on this button, and on the next page, you will be required to choose the .xml file that you exported from Blogger in the above step.
Click the ‘Choose File’ button and select the downloaded file you saved on your computer. Then click on ‘Upload file and import.‘ Start the importer and wait while WordPress handles your data.
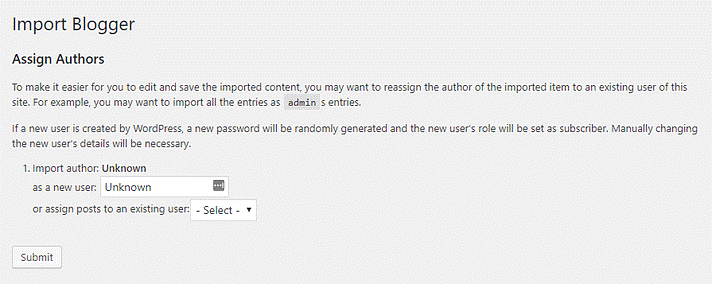
In the next segment, you will have to assign authors for your blogs. If the site is brand-new, only one user was likely created during the content management system installation.
As a result, you can choose a name for the list, and the content you’re importing will be allocated to that user automatically.
But if you have numerous authors in your Blogger account, you can assign their articles to various users at this point. Assign the authors and click the Submit button.
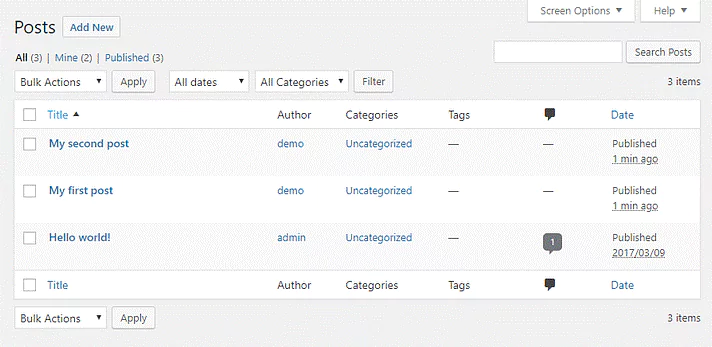
If everything goes well, you will receive a successful message notifying you that importing posts and comments from your Blogger site to WordPress is done. At this point, you can see the imported content in your WordPress posts section.
As we said earlier, you will only be able to import posts and comments using Blogger importer. For page importing, you need to work separately. However, you may face some issues importing the posts and comments. These include-
1.3 Troubleshooting Issues While Importing Content to WordPress
You may face two common issues once you choose the file and click the upload button. One is that the .xml file you downloaded is too big for WordPress to upload, and another issue is that WordPress might refuse to import the file. Here is how to solve these issues-
Limitation On File Size
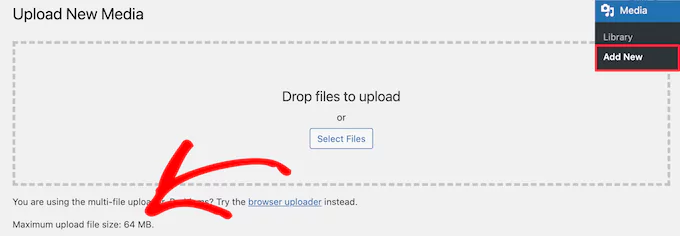
WordPress puts a limit to the maximum file size. You won’t face any problem if the .xml file you downloaded from Blogger is small. It will be imported to WordPress install.
However, the problem arises if the file size is larger than the WordPress limitation. But there is nothing to worry about; you can increase the limitation range. For this, first, check your present limit on size.
Go to WordPress dashboard > Media > Add New and find the maximum upload file limitation from the bottom of the page. Now, to change the maximum upload limit, follow the below process:
- Login to your hosting account and navigate to the Control Panel.
- Open the File Manager> Web Root > Go.
- Find the file php.ini by scrolling in the right-hand panel and right-click it.
- A menu will pop up; choose Code Edit > Edit.
- To open the locate pop-up window, use the following keyboard shortcut: For Windows and Linux: Ctrl + f For Mac: Command (⌘) + f
- You will find a search field; type upload_max_filesize in it and press Enter.
- There will be a certain limit on the upload_max_filesize limit; for example, it is 50M. Change 50M to the size you need to import your .xml file. For instance, 128M.
- Reopen the search pop-up, type post_max_size into the Search text field, and press Enter.
- Post_max_size = 50M will be highlighted. The value here needs to be updated to match the upload_max_filesize value.
- Press Save changes.
Thus, your limit on the maximum upload file size will be updated, and you can easily import the .xml file to WordPress.
Transfer Refusal
The built-in importer tool of Blogger may not work perfectly. Most of the time, it operates flawlessly. But sometimes, it flatly refuses to perform the transfer.
You will face this issue mainly when working with larger blogs with bulk articles and images. In such a situation, either the importer won’t function properly or deny to export your Blogger posts.
But no worries, we have bought you a solution to this. Though it will take some time, you will be able to fix it following the below process:
- Go to the WordPress dashboard and select Plugins > Add New.
- Search for ‘Blogger Importer Extended‘; install and activate the plugin.
- Go to Tools > Import and find “Pipdig WordPress Migrator.”
- Below the title, you will find a blue link to ‘Run Importer; click on it.
This plugin operates slightly differently from the default importer tool. It will automatically export and import files; you will need not to do any steps manually.
But for this, you must link the plugin to your Blogger account. Click the ‘Connect to Blogger’ option to access your account. You will then have the option to choose your blog. Select the blogs, and it will automatically import the posts.

It will show you the progress bar on the screen as the blogs are imported. You can see the number of posts, pages, comments, and images being imported. Wait for some hours, as it may take time for bulk blog posts and articles to process.

| NB: Blogger Importer Extended plugin transfers the contents through Google API by the plugin. Although this service is free, it does have daily limits.
Yet, you will be able to import thousands of photographs and posts in a few hours. However, the plugin will keep connecting and disconnecting automatically. But don’t panic; leave the page open and return in a few hours. You will find your Blogger blog successfully transferred to your new WordPress site. |
Thus, you can fix the issues and move to the next steps for completing the migration process.
2. Page Migration
Migrating the Blogger pages to WordPress takes a bit more work than importing the posts. You have to do this manually, so it takes time.
Go to the Blogger account dashboard and select the Pages tab to start the process. Select the pages you want to transfer to WordPress and open them in the Blogger editor.
You will find an HTML tab just below the title in the editor board. Click on it to get the HTML format of your page. Copy the entire HTML code to paste it into your new WordPress site.
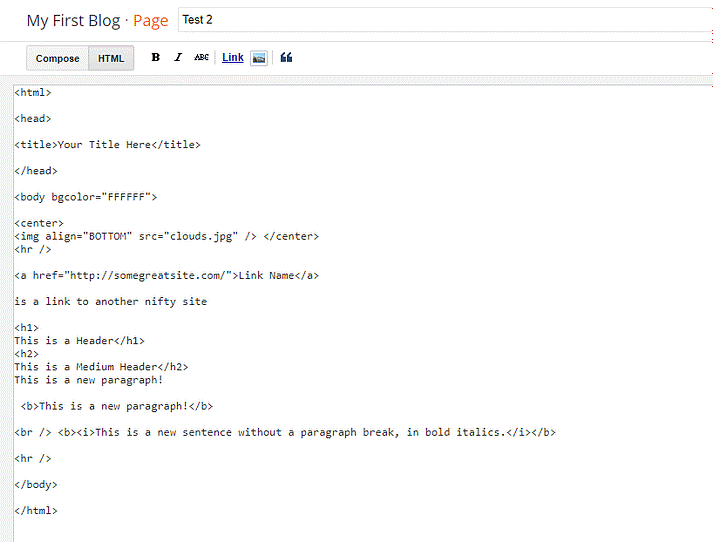
Go to your WordPress account and navigate to the Block Editor. You will find a three-dot option on the top-right hand.
Click on the button and select ‘Code Editor.’ This will allow you to work on the HTML code.
Now, paste the HTML that you copied from Blogger. In this stage, you can make some changes to the HTML code if you want. But we’d advise importing the content as it is.
Now, click on the Preview button on the top-right of the page to see the outlook of the HTML. Once you are satisfied with the result, press the Publish button, and your page will be uploaded to WordPress. You just need to repeat this procedure for your other Blogger pages.

3. Image Migration
You have imported the posts, pages, and comments in the above steps. The WordPress importer won’t import the images. For this, you will need to use a plugin to transfer the images of Blogger to WordPress. Here, we suggest you use the Auto Upload Images plugin.
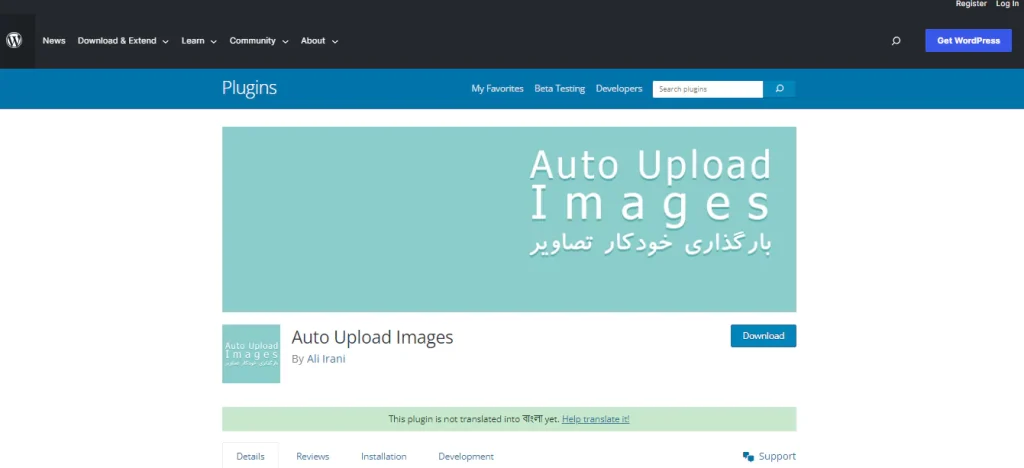
Go to the WordPress dashboard and navigate to Plugins> Add new. You will get a search bar option; simply type the name of the plugin, install it, and activate it.
This plugin will automatically find the images on your posts and pages, update their URL, and save them to your WordPress Media Library.
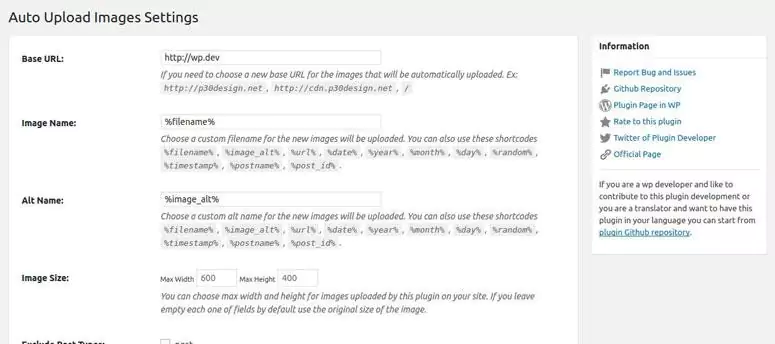
It further allows you to choose custom image URLs, file names, a maximum width and height, and more.
After Migration Steps
The work doesn’t end with just migrating your Blogger post, pages, and images to WordPress. You need to go through some more steps to ensure that the migrated content is set properly on WordPress and doesn’t cause any errors. So, here is what you will have to fix next:
1. Match Your Design
You can import the page, post, comments, image, and other elements to WordPress but not the Blogger theme. The block editor option of WordPress, though, allows you to import basic HTML and CSS; you cannot duplicate the template for your blog. So, here you get two options:
- Recreate the old Blogger site design.
- Go for a fresh WordPress theme.
WordPress has thousands of themes to choose from. You can go to WordPress Themes to search for a designed theme.
They offer you up to 11,351 for free! And the good news is that you will have categories to select themes for.
For instance, if your website relates to food, fashion, travel, or other niches, you will find separate options to choose from. Besides, there are many third-party themes available to purchase.
With the block editor feature of WordPress, you will get extensive control over your website. This allows you to design the outlook of your WordPress as you want.
You can change the layout, colors, and font to match your precious Blogger site. This will help you to keep the design intact.
The positive aspect of not hanging the design is making old visitors recognize your site. However, if you want to bring newness, that is also okay.
2. Set Permalinks
The structure of the URL is important to make your website and its content search engine-friendly. The URL of your Blogger posts has a very simple URL structure. It looks something like this-
mybloggerwebsite.com/2023/10/my-blog-post
This highlights the information about your post and defines the date, too. So, you should attempt a similar URL structure for your new WordPress site to ensure SEO friendliness.
By default, WordPress has a URL that looks something like this-
www.mywebsite.wordpress.com.
You will need to fix this up to make it SEO-optimized. Open your WordPress dashboard and navigate to the Settings > Permalinks tab.
The popping page will offer you a list of WordPress permalink possibilities. Although we usually suggest you go for the Post Title option, selecting the Blogger-like Month and Name would be best.
However, you can also use the Custom option to set a URL similar to the previous Blogger site that indicates years and months.
For this, select the Custom Structure option and type the customized URL to the text friend; it could be something like this-
| /%year%/%monthnum%/%postname%.html |
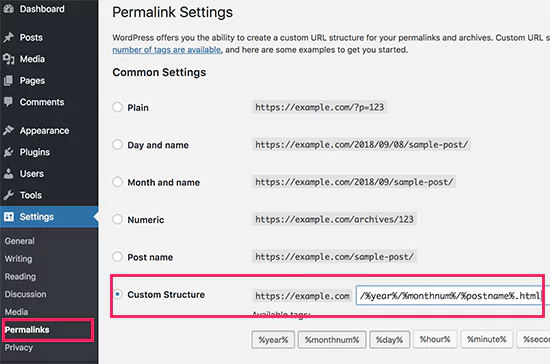
Thus, your links will look similar to the previous Blogger links and ensure the traffic sticks to your new website.
3. Redirect Blogger Contents To WordPress
Redirection is crucial to maintain your site’s traffic and SEO ranking. It ensures that when users search for any page, they land on the new website instead of the old one.
It is also important to inform the search engine that you have moved your website. You must redirect your old Blogger content to the new WordPress. Here is how to do that:
3.1 Redirect Posts
You need to work on both Blogger and WordPress to redirect the posts. Follow the below process to do so:
Step-1: Redirect From Blogger: First, you need to set up the Blogger account for redirection. You can do this both manually or by using a plugin. We have discussed both the process for you:
- Manual process
For manual redirection from Blogger, you must work with HTML codes. But no worries, the below discussions will help you with this.
First, log in to your Blogger account and go straight to the dashboard. Search for the Themes option, click on it, and scroll down.
You will find a text as “Revert to classic themes,” click on it. This will allow you to make the redirection a success.
However, Blogger will warn you of losing some features as you revert to the classical theme. Don’t panic; as you have already migrated to WordPress, this won’t concern you.
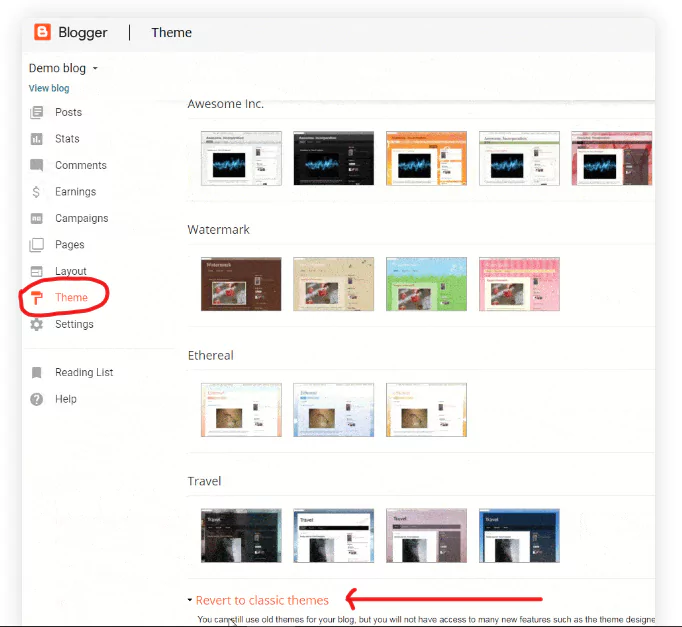
Confirm you are okay with the changes, and Blogger will lead you to a new settings page. Scroll down to the page and look for “Edit Theme HTML.”
There, you will find the theme code of your Blogger website. This is the code that designs and powers up the theme. Copy the entire code and delete it.
Now, copy the code we shared below and paste it into the place of the theme code you just deleted:
<html> <head> <title><$BlogPageTitle gt;</title> <script> <MainOrArchivePage> window.location.href="http://example.com/"; </MainOrArchivePage> <Blogger> <ItemPage> window.location.href="http://example.com/?blogger=<$BlogItemPermalinkURL gt;" </ItemPage> </Blogger> </script> <MainPage> <link rel="canonical" href="http://example.com/" /> </MainPage> <Blogger> <ItemPage> <link rel="canonical" href="http://example.com/?blogger=<$BlogItemPermalinkURL gt;" /> </ItemPage> </Blogger> </head> <body> <MainOrArchivePage> <h1><a href="http://example.com/"><$BlogTitle gt;</a></h1> </MainOrArchivePage> <Blogger> <ItemPage> <h1><a href="http://example.com/?blogger=<$BlogItemPermalinkURL gt;"><$BlogItemTitle gt;</a></h1> <$BlogItemBody gt; </ItemPage> </Blogger> </body> </html>| NB: Go through the above codes and look for “http://example.com/.” Replace this with the URL of your new domain. Be careful in doing this; a slight mistake can ruin the redirection. |
Once you are done with placing the coding, click the “Save theme” button and move to the below step.
- Automate Using Plugin
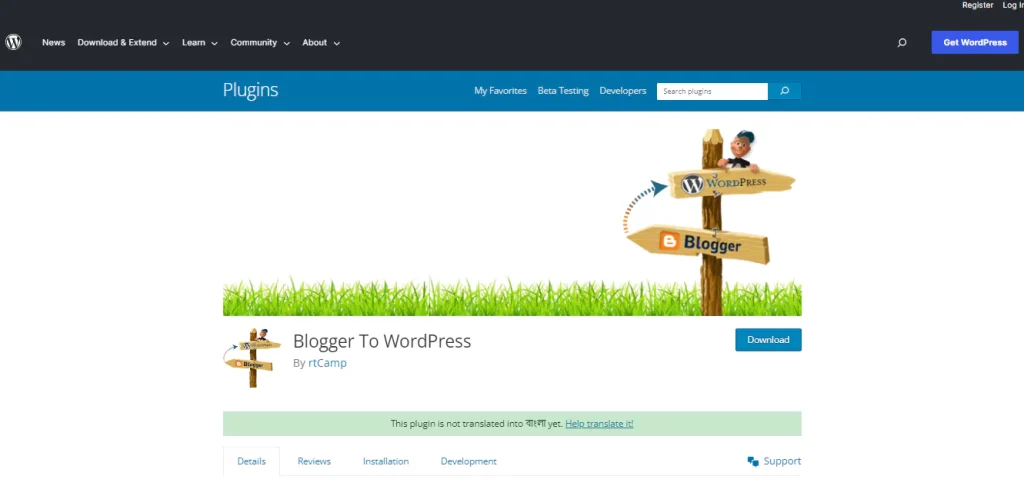
You might feel the above process is scary due to coding. But you can replace this method using a plugin. Go directly to the WordPress dashboard and navigate to Plugins > Add new. Search for Blogger to WordPress, install, and activate it.
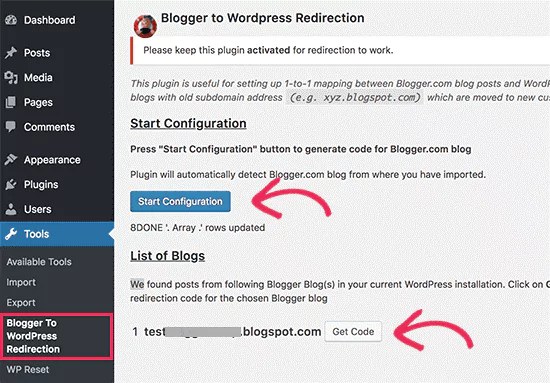
After activating, navigate to the dashboard again and select Tools > Blogger to WordPress Redirection. This will open up a page with a Start Configuration heading.
Below this is a blue ‘Start Configuration’ button; click on it. The plugin will now identify your Blogger blog’s URL and provide you with a redirection code.
Go ahead and click the ‘Get Code’ button located next to your Blogger URL. Now, it will provide the snippet of code you require to correctly send visitors from your Blogger blog to your new WordPress website.
Next, you need to log in to your Blogger account > Themes. Scroll down to the theme page and click to Revert to classic themes > Edit Theme HTML.
Next, select the entire code and delete it. In that place, paste the code you received from the plugin.
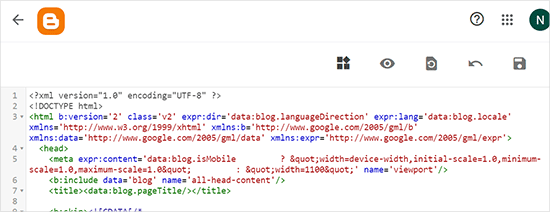
Finally, click the ‘Save theme’ button to store your changes.
Step-2: Redirect To Your New WordPress Blog: Next, you need to redirect the content to your new WordPress blog. For this, log in to your WordPress site and navigate to Appearance > Editor.
This will open up the theme editor. Go through the menu and look for “Theme Function”; you will find it on top of the list.
A coding file will open up, and click on it to start editing; select all and delete them. Next, copy the code we provided you and paste it into the editing field:
function blogger_query_vars_filter($vars) { $vars[] = “blogger”; return $vars; } add_filter(‘query_vars’, ‘blogger_query_vars_filter’); function blogger_template_redirect() { global $wp_query; $blogger = $wp_query – > query_vars[‘blogger’]; if (isset($blogger)) { wp_redirect(get_wordpress_url($blogger), 301); exit; } } add_action(‘template_redirect’, ‘blogger_template_redirect’); function get_wordpress_url($blogger) { if (preg_match(‘@^(?:https?://)?([^/]+)(.*)@i’, $blogger, $url_parts)) { $query = new WP_Query( array(“meta_key” = > “blogger_permalink”, “meta_value” = > $url_parts[2] ) ) ; if ($query – > have_posts()) { $query – > the_post(); $url = get_permalink(); } wp_reset_postdata(); } return $url ? $url : home_url(); } Scroll to the bottom of the page and click the “Update file” button. This code does not require any changes. When you click the “Update file” option, your current theme will be told to redirect viewers from Blogger to the specific content you transferred into your freshly created WordPress site.
| NB: If you decide to change your WordPress theme, you must repeat this step and copy the code to the new theme’s Theme Functions file. |
3.2 Redirect Pages
As we previously discussed, the Blogger importer tool only imports your posts, not the pages. You have to migrate the page manually; you already know the procedure from above.
However, after migrating the pages, the issue you will face is its URL structure. Because the URLs of Blogger pages and WordPress pages have different structure, such as:
| URL of Blogger Pages | http://example.blogspot.com/p/about-us.html |
| URL of WordPress Pages | http://example.com/about-us |
As you can see, the Blogger pages have a ‘.html’ in the last; you need to fix that up. The process is simple; you can do this using the All in One SEO (AIOSEO) plugin.
3.3 Redirect RSS Feeds
The redirection process doesn’t end here; if you have RSS subscribers, they will still see your Bloggers’ content. That is, they will find the previous contents but get the new ones.
To keep up with their trust, you need to inform your Blogger blog that you have a new RSS feed. For this, it will require another redirection; the process is as follows-
- Navigate to Blogger dashboard> Settings.
- Go to the ‘Site Feed‘ section.
- Go down to “Post Feed Redirect URL” and select the “Add” link.
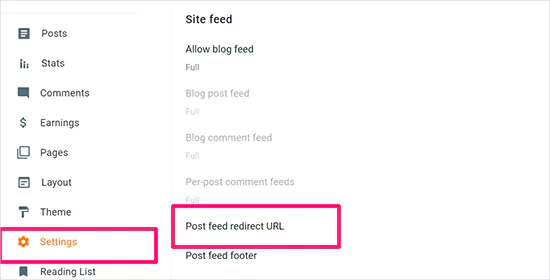
- It will bring you a pop-up where you will need to put the RSS feed of your WordPress website. In the text field area, type- https://yoursite.com/feed/ (must change the ‘yoursite.com’ portion with your own domain name).
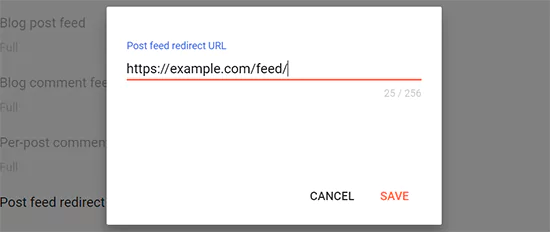
- Click on ‘Save’ button on the top-right corner of the page.
4. Testing
Following the above step, you should successfully migrate your Blogger website to WordPress. To test if everything is going okay, go to your Blogger website and try to reload the posts.
If the redirection is successful, you will land on the new WordPress website at this stage. Repeat this process a few times and check if it works.
In case you find any issues, check whether the redirection is okay. For instance, recheck if you have copied the entire code or correctly edited the URLS from all places.
You may check the RSS feed for redirects if you use an RSS reader by clicking on the link to one of your posts. If everything goes okay by now, it should take you to the WordPress website.
The Bottom Line
As you can see from the above discussion, migration from Blogger to WordPress is super easy. You can do this by yourself without any technical help.
Thanks to the Blogger importing tool that makes the post-migration real quick. However, you may need to worry a bit about page migrations as the tool doesn’t support pages.
But there is nothing to fear; WordPress plugins will solve that. Nevertheless, be careful with the redirection process as it deals with coding.
In this case, if you are not confident enough, get help from any expert or someone who knows WordPress functions well.
Yet, if you follow the steps accurately, as we mentioned above, you can migrate from Blogger to WordPress on your own.
Lastly, if you face any issues with indexing your new WordPress website, check out this- Common Page Indexing Issues and Its Solutions.

