Are you tired of the higher maintenance cost of Drupal, or do you want more control over your websites? Migrate your Drupal site to WordPress; trust us, you won’t regret it!
Drupal and WordPress are popular content management systems widely used for website management. But when it comes to flexibility, maintenance cost, and overall performance, WordPress wins the race. This makes you think about migrating your Drupal to WordPress, which is pretty simple. Using migrating plugins, you can quickly do this task.
So why wait any more? But first, let’s explore the reason for transferring your site to WordPress.
Why Should You Migrate From Drupal To WordPress?
To assure yourself about the right decision on migrating Drupal to WordPress, we are presenting you some logic; check them out-
- More User-Friendly
Once you install WordPress and signup, it is ready to use. The interference is pretty simple, making this CMS ideal for beginners. You don’t need to be a tech guy to use this. In comparison, you will need time to figure out the functions of Drupal. This is ok for developers, but being a beginner, you will not find it as easy as WordPress.
- Faster Speed & Better SEO
Google supports WordPress best as it facilitates all the core SEO features like responsiveness, user-friendliness, lightweight and faster speed. These facts make WordPress SEO-friendly. So, using this, your content will climb the ladder fast, ranking better on SERP. In contrast, Drupal has a heavy loading system, and the module also takes additional time to load. This makes the CMS slower, which affects the SEO.
- Theme & Plugin Compatibility
Both WordPress and Drupal offer plugin and theme access. But when it comes to availability, nothing can beat WordPress. You will get more flexibility in choosing themes and plugins for WordPress.
- More Customization Options
WordPress provides you with more flexibility and customization facilities than Drupal. The Block editor of WordPress gives you maximum control over the layout and appearance of your site. So, if you want to bring a personal touch to your site, WordPress is the best option.
- Higher Security & Tech Support
WordPress has improved its security system in the past years. Besides, with the security plugins, you can get premium security for your site. The larger user base is another fact to consider here to get frequent security updates. Additionally, the extensive community support can provide more timely responses and solutions than Drupal.
- Cost Effectiveness
Though setup and hosting services cost the same for Drupal and WordPress, there is a huge difference in maintenance cost. Drupal demands technical knowledge; hence its maintenance costs are significantly higher.
To fully explore Drupal’s capabilities, you must hire professionals, which is very expensive due to its small community and lack of expertise. On the other hand, WordPress maintenance is less expensive, and it is affordable even for small organizations.
These reasons are solid enough to make your migrating decision. Yet we are showing you a side-by-side comparison between Drupal and WordPress to make your decision easier-
| Comparing Criteria | Drupal | WordPress |
| Easy To Install | ⭐⭐⭐⭐ | ⭐⭐⭐⭐⭐ |
| Feature Availability | ⭐⭐⭐⭐ | ⭐⭐⭐⭐⭐ |
| Customization Facility | ⭐⭐ | ⭐⭐⭐⭐⭐ |
| Tech Support | ⭐⭐⭐⭐ | ⭐⭐⭐⭐⭐ |
| Search Function | ⭐⭐⭐⭐ | ⭐⭐⭐⭐⭐ |
| Themes & Plugin Availability | ⭐⭐⭐⭐ | ⭐⭐⭐⭐⭐ |
| SEO Options | ⭐⭐⭐⭐ | ⭐⭐⭐⭐⭐ |
| Compatibility | ⭐⭐⭐⭐⭐ | ⭐⭐⭐⭐⭐ |
Migrating From Drupal To WordPress- A Stepwise Guide
Migrating from Drupal to WordPress is easy, as Drupal has specific plugins for this. So, the major part of the process is automated; you don’t need to take much hassle. Yet, to make the steps easier, we have divided the process into three sections- pre-migration, migration, and post-migration. Go through the process, and you can easily learn the system-
Pre Migration
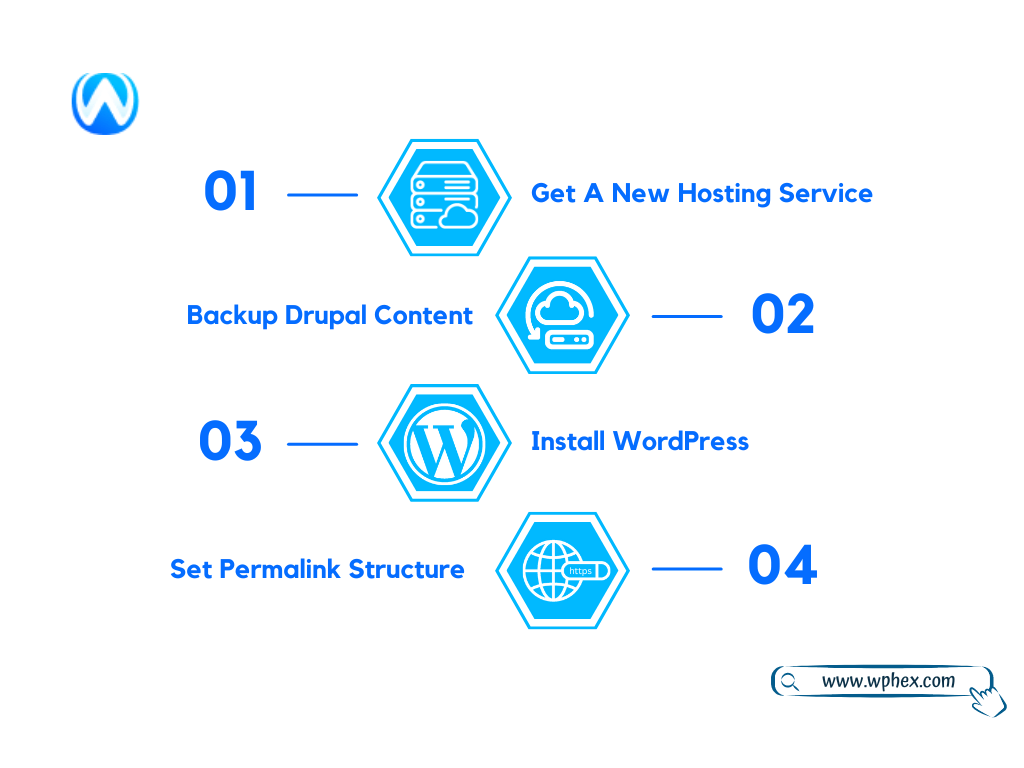
Before moving directly to the migration process, here are some steps that you need to go through-
Get A New Hosting Service
If the hosting service you are currently using for Drupal supports multiple websites, you can open a new website for WordPress. In this case, you will need not to move to a new hosting service. But here, the performance of the present hosting should be considered.
Question yourself if you are satisfied with their services. But if you don’t have multiple-site facilities with your hosting package, two options are open – either upgrade your hosting plan or switch to a new hosting service.
Regarding WordPress websites, many hosting services are available that are built specially for WordPress. These managed WordPress hosting will work best for your new website as they are search engines optimized for WordPress. Besides, you won’t face compatibility issues while using WordPress plugins. Here wphex has listed some of the best options for you.
Backup Drupal Content
Though, migrating from Drupal to WordPress doesn’t delete the existing files on your website. Yet, for safety, it is better to back up the contents. It takes years to build a top-notch website, so there is no chance of taking risks.
However, Drupal has no built-in backup tool; you need to do it manually. For this, you need to backup both the database of your site and the Drupal root dictionary. The steps are as follows-
- Database Backup
You can backup the Drupal database using a module or with phpMyAdmin. The process is as follows-
Using Module
- Go to the Drupal admin interference and navigate to Administration ➡ Extend.
- Choose a backup module; for example- Backup and Migrate.
- Install, download, and enable the desired module.
- Configure the module – Administration ➡Configuration➡ Development ➡ Backup and Migrate.
- Click Backup now and download the backup file.
With phpMyAdmin
- Log in to your web hosting service and find PHPMyAdmin.
- Locate and select the Drupal database.
- Click the Export ➡ Select all
- Mark the checkboxes, Structure➡ Data➡Save as File
- Drupal root directory backup
- Create a folder in the parent folder outside your Drupal root directory (e.g. backups).
- Click the Settings tab ➡ Destinations ➡ Add Backup Destination.
- Create a Label and select Server File Directory➡ Edit
- Add your directory path ../[backup-folder] (e.g., backups).
- Click Save ➡ Backup tab ➡ Entire Site
- Select your created backup label and click Backup now.
Install WordPress
Usually, the managed WordPress hosting comes with an automatic or one-click WordPress installation. However, if you don’t find any direct WordPress option, you will surely find software installers like Softaculous.
This also offers you an easy-going process for installations. Yet, if you want to go manually, the door is open. Just find the official WordPress website and download the latest WordPress version. Once you are done with the installation, you can access the dashboard.
Set A Permalink Structure In WordPress
Drupal offers you intensive control over the appearance of your website link. But WordPress has a different link structure that doesn’t match with Drupal. Let’s suppose your Drupal website has the following URL- wphex.com/blog/drupal-to-wordpress.
But as you migrate to WordPress, it will set the permalink by default. At this point, the URLs of your pages and posts will appear something like this- wphex.com/?=123.
It is better to set the permalinks before you migrate the website. Afterward, it makes interlinking replacement easier. Go to Settings ➡ Permalinks. You will get many options for URL structure. We suggest you go for the Post name option to get the neat URL structure.
Besides, this enables you to customize the permalinks for each post and page. So, you will get full control over your URL structure.
Migration Process
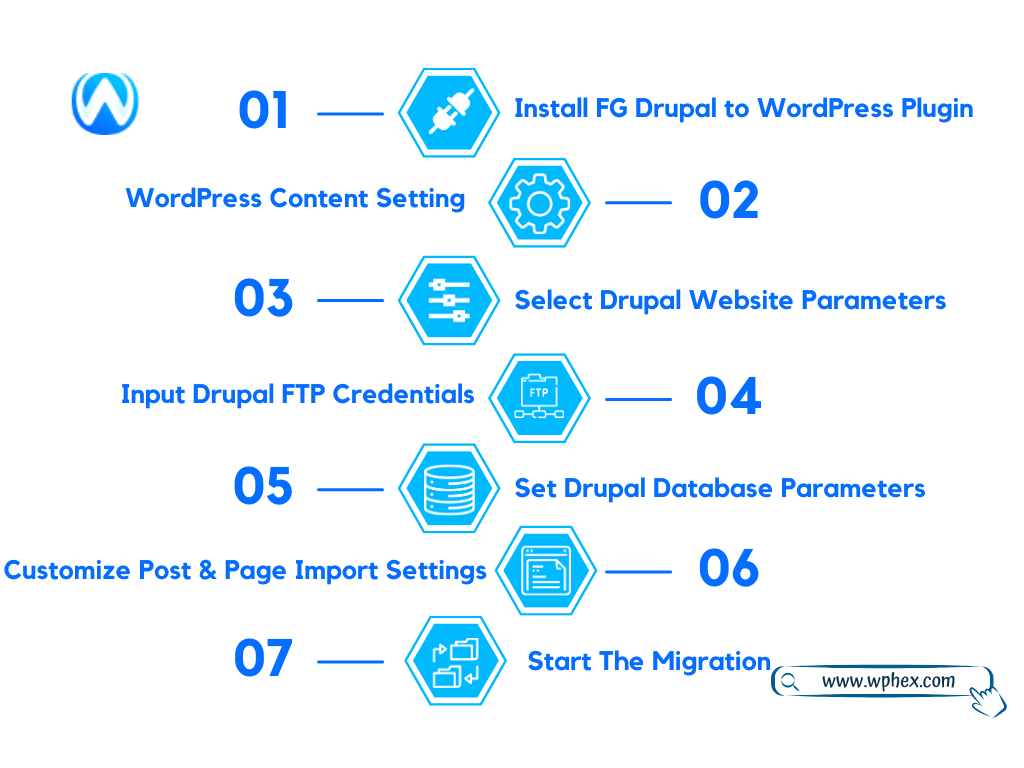
Now that your WordPress website is set, you can move to the final migration process. When you migrate from other platforms like GoDaddy, Squarespace, or Wix, you need to go through the hassle of a manual process.
But no worries with Drupal. It offers you plugin integration that assists you with the migration making your task much more convenient. So, here are the steps to follow-
Step #1: Install the FG Drupal to WordPress Plugin
FG Drupal to WordPress is an amazing plugin that migrates your content automatically. It has both free and paid/premium versions. The free version is enough to migrate the most essential components of your website, like- posts, pages, images, etc. However, to import more elements, you can go for the premium version too.
| Free Version | Premium Version |
| – Posts. – Pages. – Categories. – Tags. – Images. – Metadata. |
– All free version contents. – Comments. – User accounts (including authors and administrators). – Custom fields. – Navigation menus. |
To install the plugin, follow the below steps-
- Go to your WordPress dashboard and navigate for Plugins ➡ Add New.
- You will find a search bar; type FG Drupal to WordPress in the box
- Once you have found the plugin, click on Install Now.
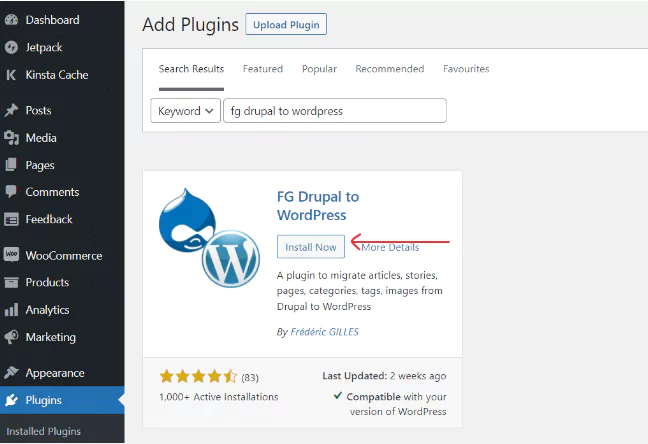
- Wait for some time to complete the installation. Once it is done, click on the Activate button. Your plugin is all set for migration!
- Once it is activated, you can start the importing process immediately by pressing Import.

Step #2: WordPress Content Setting
If you don’t want to start the process immediately after installing the plugin, no worries. You can do it anytime you want. For this, go to your WordPress dashboard; select Tools ➡ Import. A box will appear; look for Drupal and click on the Run Importer just below Drupal.

Remember, if you are using the free version of FG Drupal to WordPress, it will only import the post, pages, images, categories, metadata, and tags.
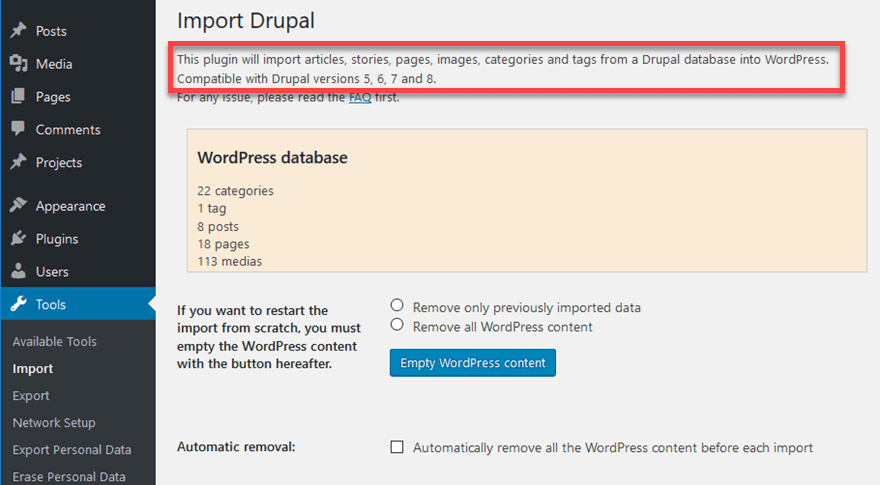
However, if you have added any test page to your WordPress, better remove this now. Below the Import Drupal page, you will find an Empty WordPress Content option outlined in a blue box. Check mark the Remove all WordPress content option and click on the blue box.

Step#3: Select Drupal Website Parameters
In the next segment, you will get a heading with Drupal Website Parameters. Under this section, you will have to input the URL of the live Drupal website. Simply copy and paste that.

Below this, you will get options to choose media downloading medium. Though HTTP is set as default, we suggest you select FTP, especially when you have a large website.
Step #4: Input Drupal FTP Credentials
Scrolling down, you will get the section where you need to input the FTP credentials of your Drupal account. But where to get this information? No worries; we will assist you in getting the FTP credentials of Drupal.
- Log in to your web hosting control panel, like- cPanel, Plesk, or custom control.
- Locate FTP Accounts; you will find it under “Files,” “FTP,” or “File Manager.”
- View the account, and you will find FTP credentials or login information, including host, port, password, etc.
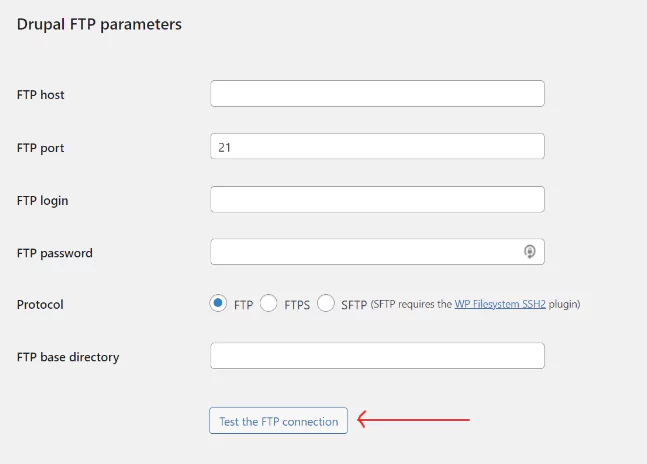
NB: If you haven’t set up the FTP account before, you must set this now.
After providing all the FTP credentials, click on the Test the FTP connection button. You will move to the next step if your input information is correct. If there is any issue, you will get an error message.
In this case, check the credentials again and ensure you have entered them correctly. If you can’t solve the issue, contact the hosting server.
Step#5: Set Drupal Database Parameters
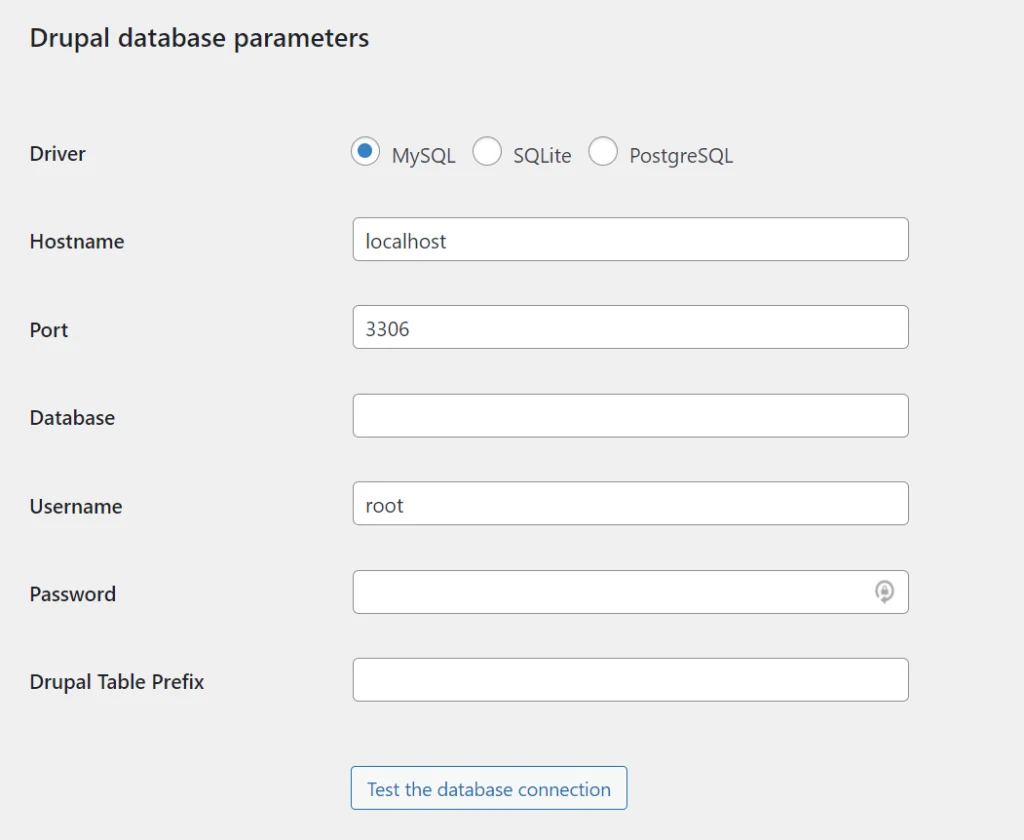
In the next segment, you will find a heading for Drupal database parameters. Here you will need to choose the type of database you use in Drupal; it could be MySQL, SQLite, or PostgreSQL.
Then you have to give the hostname, port, and other user details. In the last requirements box, you will find Drupal Table Prefix. What’s that, and from where to get it?
Log in to your Drupal site through FTP or your web host’s file management. Now, navigate to your Drupal installation’s /public_html/your_drupal_directory_goes_here/sites/default directory.
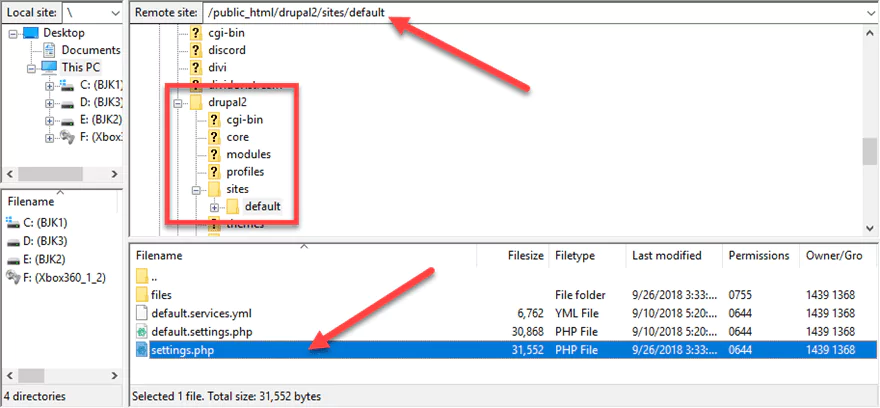
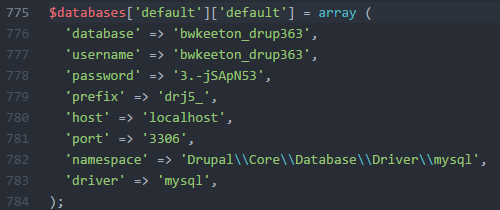
Look for settings.php, where you will find the required information. Make sure not to break any changes to it; simply copy the info and paste it into the WP dashboard.
Now, press the Test the database connection button, and we will get a green message as Connection successful.
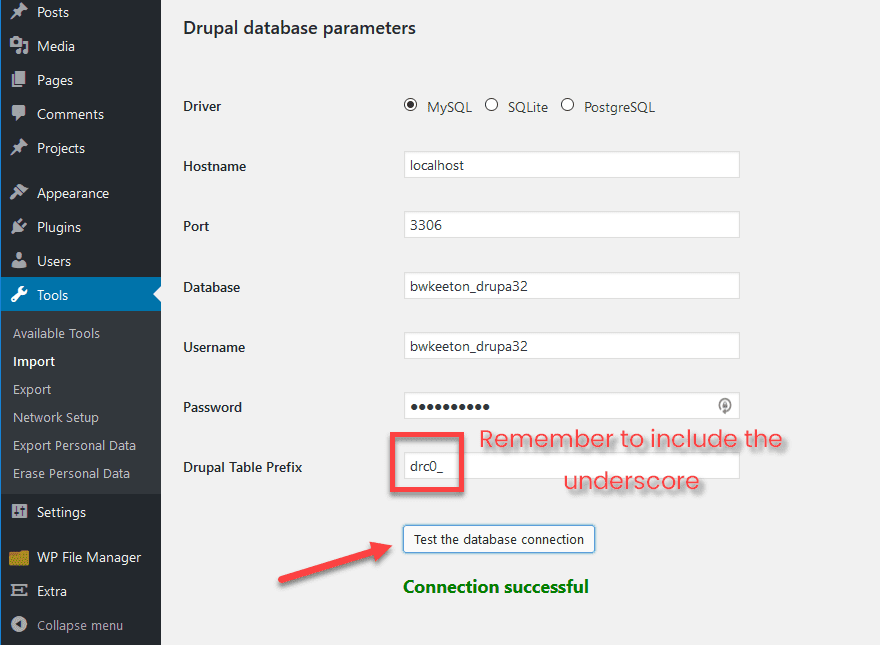
You need to add the underscore when pasting the Drupal Table Prefix (which is simply referred to as a prefix in the settings file). It is a prefix component, and the Connection will be lost without it.
Step #6: Customize Your Post and Page Import Settings
Once your connection is successful, you will find a Behavior segment scrolling down. Go through each of the options and check the mark accordingly. These choices are up to the individual; make sure everything is set up how you want it.
For the Import summary section, we suggest you choose the ‘to the excerpt’ option. This will save you from adding the excerpt manually.

Next, you must provide WordPress as the location where the media files should be imported. The default setting will use the usual WordPress media directory to store imported files, which is ok.
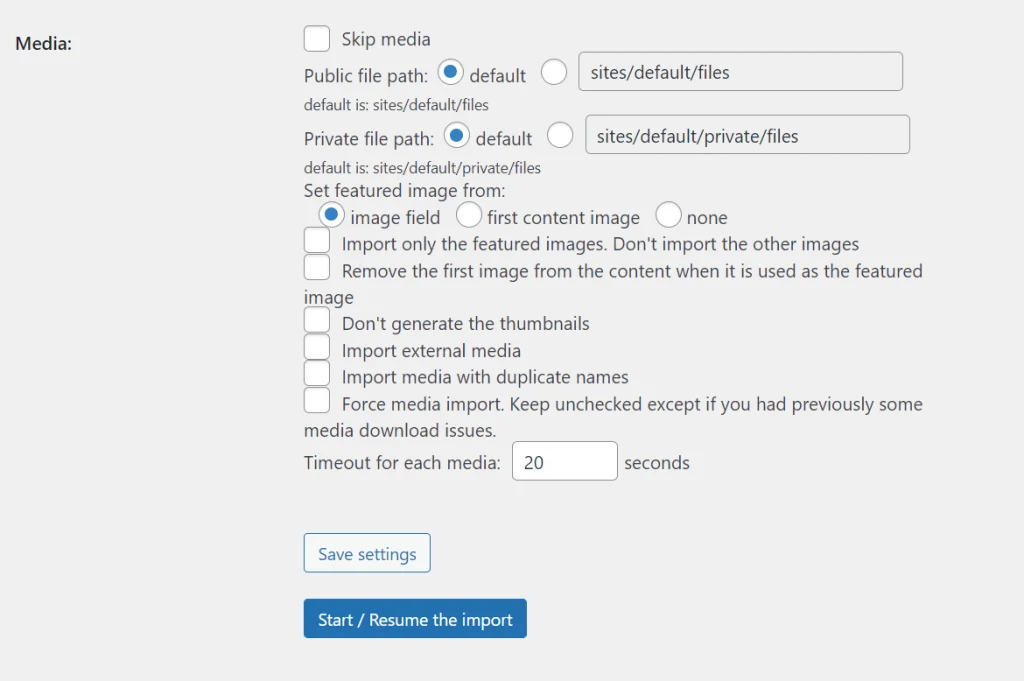
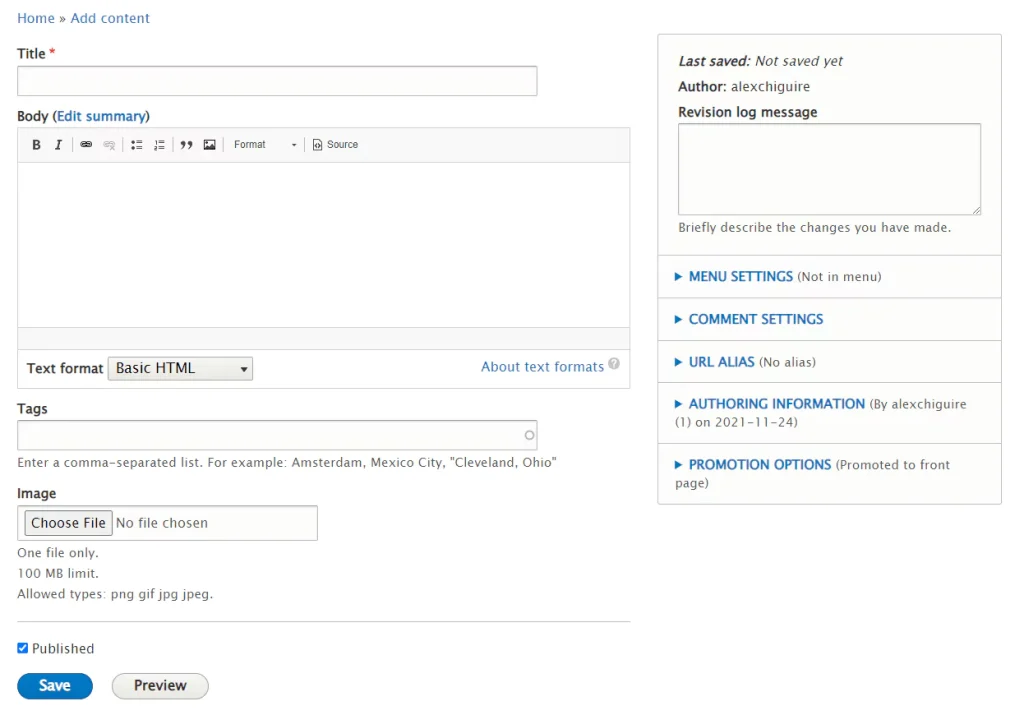
Additionally, you have the option to specify which photo WordPress should use as a featured element on your pages and posts. The image file that you utilize in Drupal will be selected by the image field option. Below the Drupal editor and the Tags box, you may see it as follows:
The remaining settings are concerned with disabling the creation of thumbnails and adding featured images to the text of your imported content. We suggest you leave those options disabled. Here’s how your final media settings should look like-
If a media file takes more than 20 seconds (by default) to load, FG Drupal to WordPress will stop the import operation by default. Though you can increase or decrease the time, it won’t be an issue if you are using a good web host.
Step #7: Start The Migration
Once everything is ready, click the Start/Resume Import option.
You will find a progression bar to show you the progress of the migration from Drupal to WordPress. It will take a while to complete the process, depending on the size of your Drupal site.
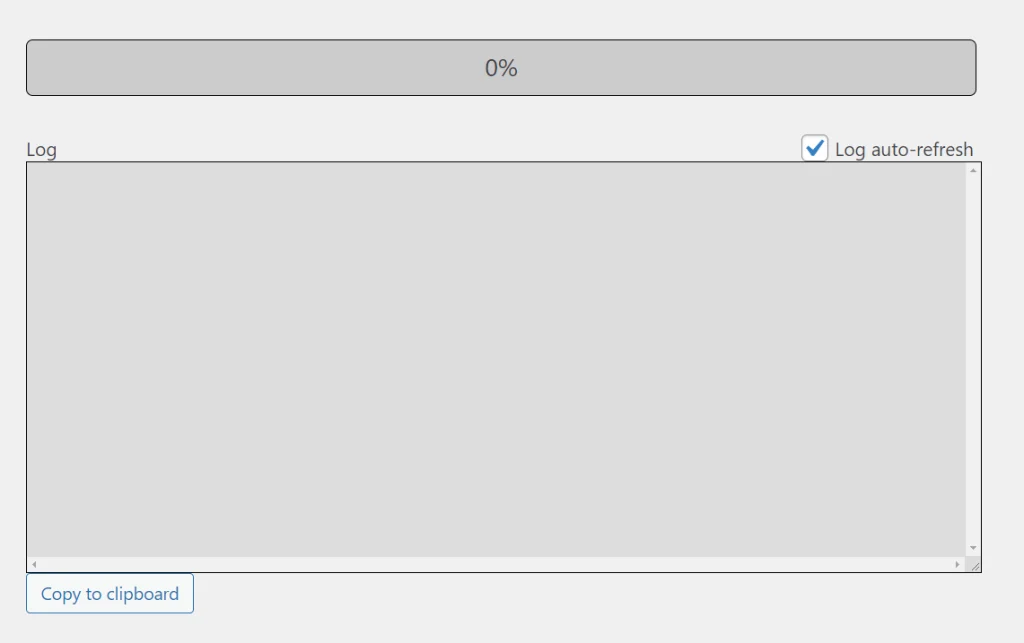
Once the progression reaches 100%, your migration is complete, and you will get a final success message. As the migration is done, you’ll get access to a detailed log of everything that took place during the migration process.
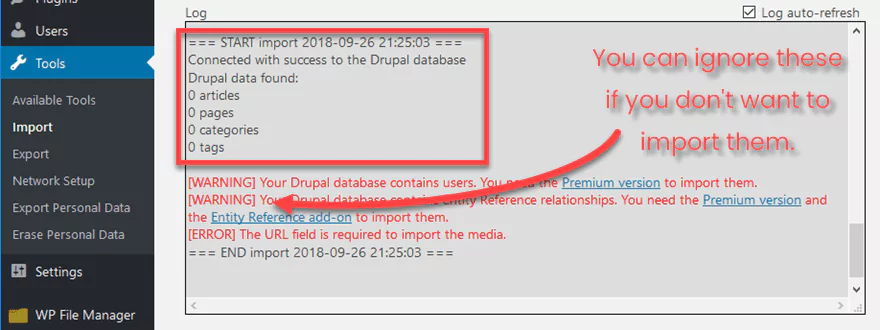
The red warnings you will find on the log are most likely just upsells to the premium edition; don’t get frightened seeing them. These marketing strategies undoubtedly work, but be sure you’re not receiving a real error instead of feature warnings.
Post Migration
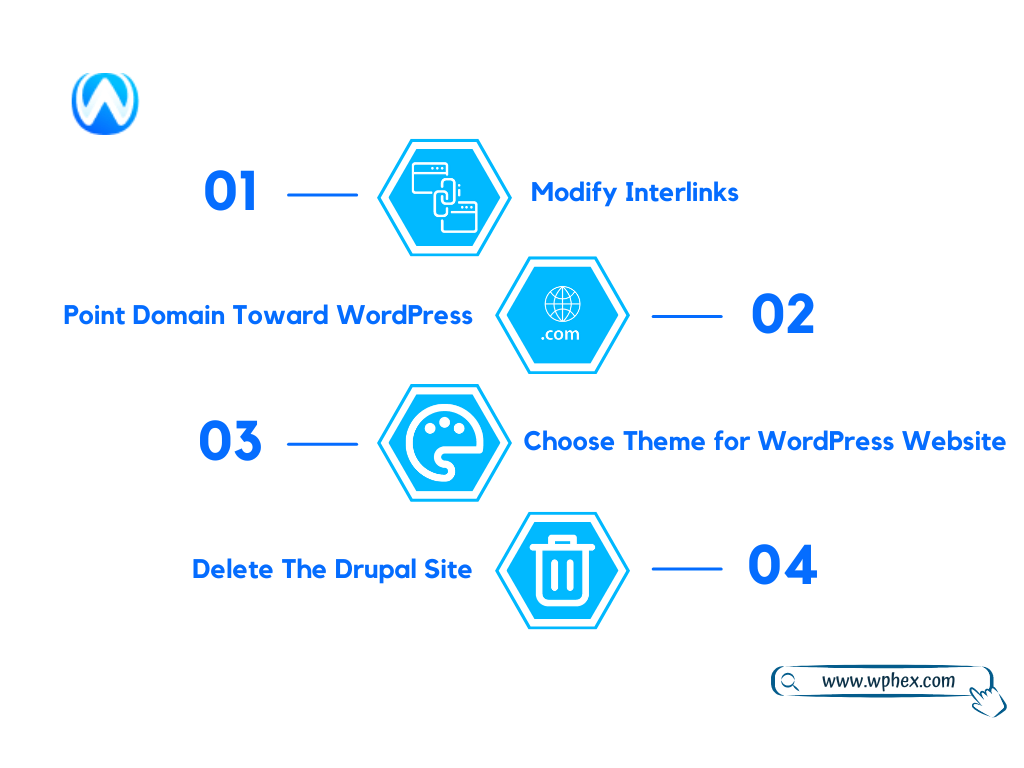
Once your migration is done, don’t leave the page yet; there are more things to do. Here we have listed the post-migration steps that you must follow to set up the new WordPress account to prevent any errors.
- Modify Interlinks
Scroll down after you get the final success message. You will find a section name- After the migration, click on the Modify internal links. This will update the permalink structure, and the URLs will be 301 redirected to their new location- WordPress.

The process is fully automated, and it won’t take minutes to complete the task. Soon you will receive an Internal links modified notification.

- Point Your Domain Toward WordPress
Your WordPress is now set, but if anyone browses your website, they will land on your Drupal website. This is because the domain is still directed to the old site. So, to solve this issue, you need to point your domain toward WordPress.
You need not purchase a new domain for this; the existing Drupal domain can be pointed toward WordPress. However, the process can vary depending on whether you use a domain register or the domains set by the hosting service.
If you have used a domain register for your old site, go to the platforms’ account and change the DNS setting. Check the documentation of your domain registrar if you don’t know how to do this.
After painting the domain to WordPress, your new site is live. Now, visitors can get access to it. But the process may take some time, so be patient.
- Choose a Theme for Your WordPress Website
At this point, you might be wondering as your website on WordPress looks quite different than the previous one. This is because it is now in WordPress’ default theme. You can select a new theme; free and paid options are available.
Getting free themes is very easy with WordPress. Login to your WordPress account, navigate to the dashboard, and click- Appearance → Themes → Add New
Many themes will appear on the screen; choose the one you find best and activate it.
Check out third-party marketplaces for the greatest deals on premium themes. You can select any theme that fits your website and download it. After that, return to your WordPress dashboard and select Upload Theme.
Your theme will be saved in your computer’s.zip file. Now, to apply the theme to your account, click the Activate button, and the new theme will be activated!
- Delete The Drupal Site
Once you are assured that all your previous content or database is migrated to WordPress and the new site is working ok, you can delete the Drupal account. However, if you are using a single hosting for both Drupal and WordPress, there is nothing to worry about the deletion.
You can take time, test your new site and then delete it later. But if they are running two different hostings, then delete Drupal. Keeping both will require paying for both, which wastes money. Yet, you can keep the previous account temporarily if you are not confident enough.
But as we have already told you to back up the site in the pre-migration step, you can delete it without a second thought. Simply log in to your Drupal account and follow the below steps-
- Go to the User Management section in your Drupal admin dashboard.
- Navigate to the User Account.
- Look for a delete or cancelation option. Clicking on this will offer you some options regarding deleting the account.
- Choose to delete the account and its content.
- Click on cancel account.
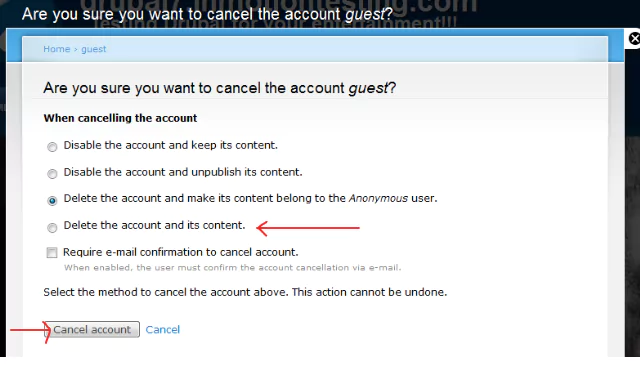
Soon you will get an email about the deletion of the account. Thus all your content now exists on WordPress, your new site.
The Bottom Line
From the above discussion, you know the migration procedure and can quickly transfer your Drupal site to WordPress. Undoubtedly, this would be an excellent decision to get more facilities in managing your content, getting better options on themes, plugins, and more.
Besides, WordPress has built-in SEO features that will bring more effective responses from your site, yet, you can check this article- WordPress Website Optimization Techniques, for better results.

