If you want better flexibility and control over your website, migrating from Weebly to WordPress is a wise decision! Besides helping with SEO, WordPress has vast themes and plugin choices that will make your website management much easier.
You can migrate from Weebly to WordPress in three methods. These are- manual migration, automated migration, and outsourcing. The first method is really time-consuming and not suitable for large website migration. You can automate the process to get faster results by using plugins. However, if you have a large website with vast images and other content, the best solution is to outsource the migration process. Though it is an expensive process, it is worth the money!
In this article, you will discuss the migration from Weebly to WordPress in detail. But before jumping to the procedure, let’s analyze whether transferring from Weebly to WordPress is a wise decision-
Why Migrate From Weebly To WordPress?
Flexibility and Customization: WordPress offers you the highest level of customization facilities. You will get thousands of themes and plugins to add new features to your site. Thus, you can present your website just as you want. On the other hand, though Weenly also offers customization facilities, it is limited to some extent. You won’t get the same level of flexibility in Weebly that you get from WordPress.
Content Management: Weebly has a user-friendly content management system. It has drag-and-drop features that make it an ideal option for beginners. However, regarding managing complex websites, you may face issues handling large volumes of content with Weebly. In contrast, WordPress has a robust CMS system that supports small to big or simple to complex sites. Besides, the block editor option makes your experience more swift.
SEO: WordPress has a vast range of SEO plugins that give you additional control over SEO optimization. Besides, many managed WordPress hosting services are search engine friendly. These can benefit you a lot with SEO. In contrast, Weebly includes some fundamental SEO tools, but it might not have as many control and optimization choices as WordPress. Besides, Weebly often faces mobile optimization issues, a major factor to consider for migration.
Scalability: The high scalability of WordPress makes it suitable for small businesses and large enterprises. You can easily add new features and functions using plugins as your site grows. But while running big Weebly websites, you may face some limitations, which makes WordPress a better choice.
Migrate From Weebly To WordPress- A Stepwise Guidance
For your better understanding, we have divided the migration process into three major categories: pre-migration, Migration process, and post-migration. So, go through the next section and migrate your Weebly website to WordPress with ease-
Pre Migration

Before going directly to the migration process, you must make some preparations. These include- purchasing a domain, setting up a temporary domain, and installing WordPress. These steps are discussed below-
- Purchase A Hosting
The first step to moving your Weebly website to WordPress is getting a suitable hosting service. There are different hosting services, but to get the best output, consider managed WordPress hosting. These services are designed for WordPress, so you will get additional benefits running your site in their hosting. For instance, you won’t face any issues with WordPress plugin compatibility. Plus, managed WordPress hostings are optimized for WordPress.
But are all of them trustworthy? Of course not. We have listed some of the best hosting for WordPress from our years of experience, including SiteGround, DreamHost, Bluehost, A2 Hosting, and a few more.
- Setup A Temporary Domain
You will require a temporary domain to migrate your Weebly site to WordPress. The majority of the hosting services provide you with a free single domain. Using this free domain, you can transfer the Weebly site to WordPress.
For this, create a subdomain in the hosting control panel by assigning your old domain name to the new server without transferring it. For example, you can add something like this- http://wordpress.xyz.com/
After completing this step, make a note of the new host’s “nameserver” information and add a DNS record (an “A” or “CNAME” record) in the domain area of your Weebly account. After completing the migration process, you can point your old Weebly domain to the temporary one.
- Install WordPress
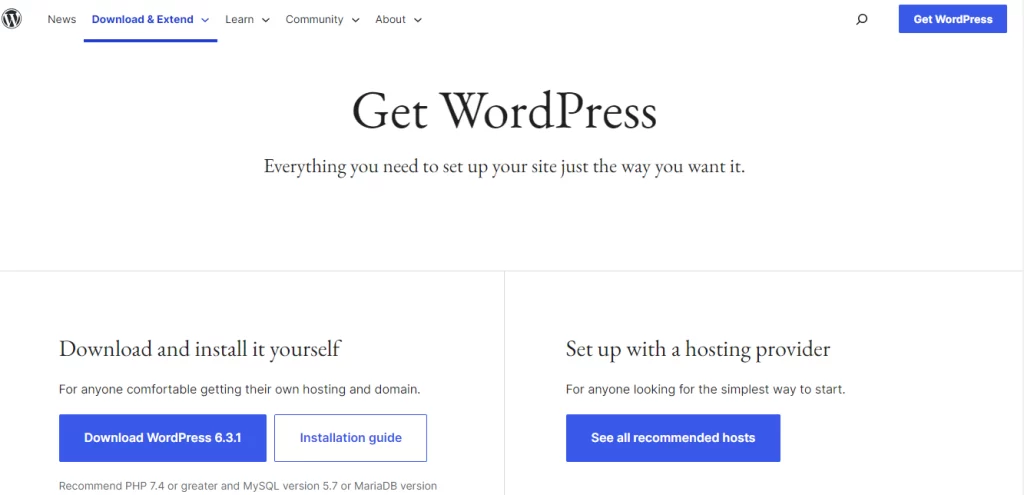
When using managed WordPress hostings, you may get WordPress installed by default. If you don’t find it pre-installed, no worries; there is surely a one-click solution to it. Just go through the instructions; it may need to provide some additional information like- domain name, name of the site, etc.
Within a few minutes, you will get your WordPress installed. However, if you want to install it manually, simply go to the official WordPress website and download & install the latest version. When the installation is finished, visit your temporary domain to verify that the default theme is visible. You are now prepared to start the migration process!
Migration Process

You can migrate from Weebly to WordPress in three methods. Use any of these that you find best for your site; these are discussed in detail-
Method #1: Manual Migration
Manual migration is the simplest solution to switch from Weebly to WordPress. It is a simple copy-paste. All you need to do is copy the content from Weebly and paste it into WordPress. The plus point of using this method is that you can be sure that all your content is transferred accurately.
But for large sites, this can be really time-consuming to migrate manually. So, if you have a vast website, this process is not for you! However, this method is perfectly okay if you have a small site with few posts and pages. Here is the process to follow-
Step- 1: Setup Pages and Posts In WordPress
Before moving to the copy-paste segment, you must create pages and posts in WordPress. This will make the process fast. If you don’t create the pages in advance, after copying from Weebly, it will require you to create each page separately and then paste the content, which is a big hassle and time-consuming! So, be smart and wise by setting up the pages in advance. You can do this in two ways- manually or by using plugins. The process is as follows-
- Manually Add Page & Post To WordPress
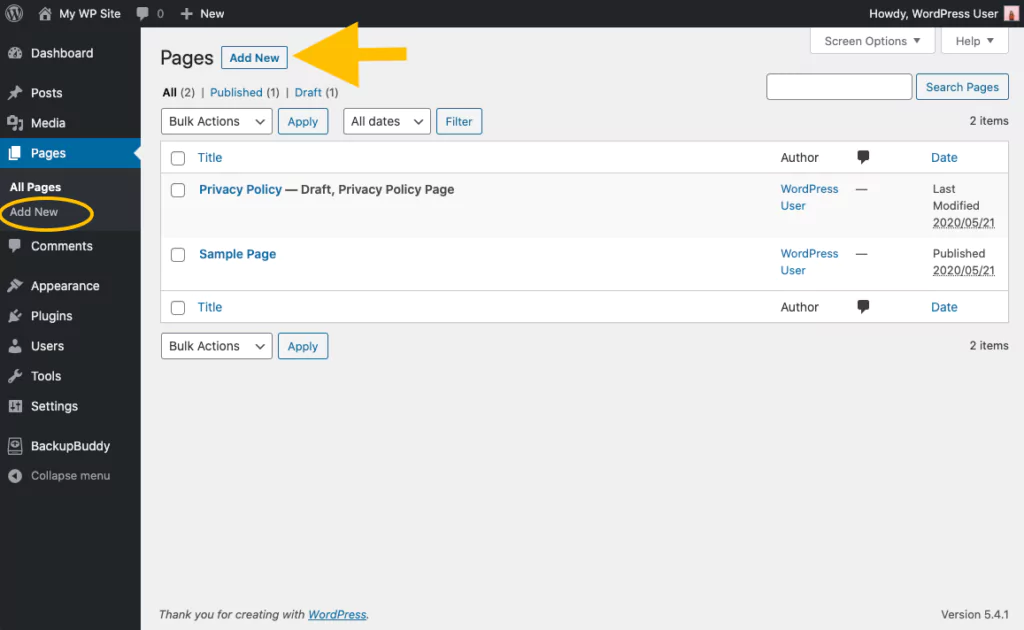
Go to the WordPress dashboard and select ‘Pages.’ This will bring up an ‘Add New’ option, as marked in the below image. Click on the button to create a new page. In this way, you can manually create new pages 1-by-1.
- Use Plugins To Add Pages and Posts On WordPress
Manual page adding is time-consuming, so automating the process uses page-creating plugins like Bulk Page Creator or Quick Bulk Post & Page Creator. These will help you to create bulk pages much faster. Install and activate any of these plugins to your WordPress account to get this facility. Now you can use them; here is the process of using both the plugins-
- Bulk Page Creator:
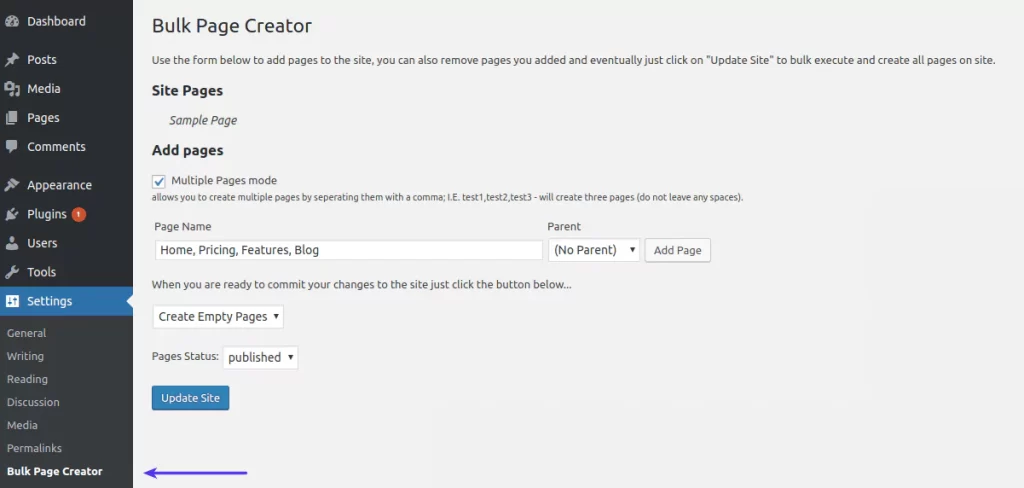
Once activated bulk page creator, navigate to the WordPress dashboard and select ‘Settings.’ Then click on the ‘Bulk Page Creator’ tab. You will find an ‘Add pages’ option; checkmark the Multiple Pages mode from there. In the next segment, you must type the name of every page. Use commas in between every name, and don’t give any spacing. For example- Home, Pricing, Features, Blog.
- Quick Bulk Post & Page Creator
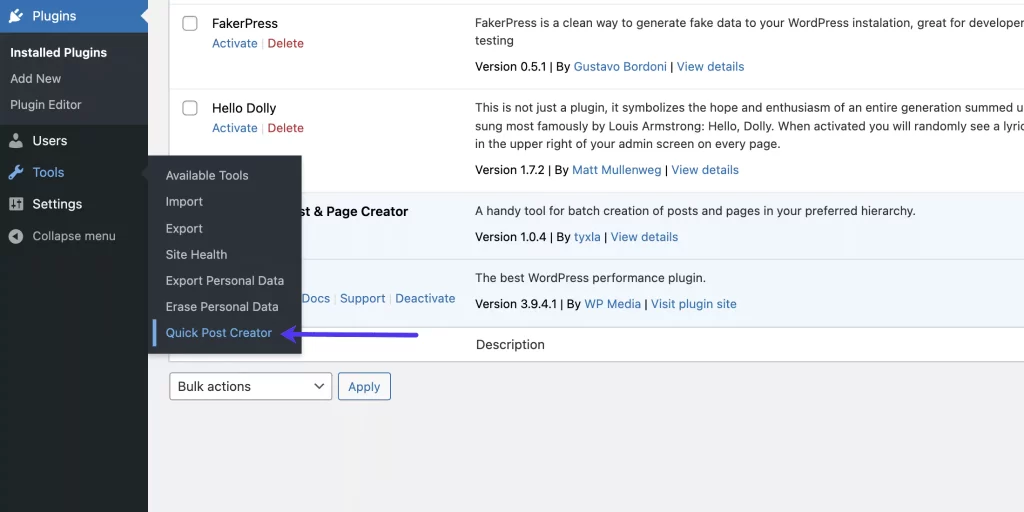
The Bulk Page Creator plugin only automates the creation of pages. But by using the Quick Bulk Post & Page Creator plugin, you can also automate creating posts, media, hierarchies, and much more. Once you have installed the plugin, click the Tools> Quick Post Creator tab on the WordPress dashboard.
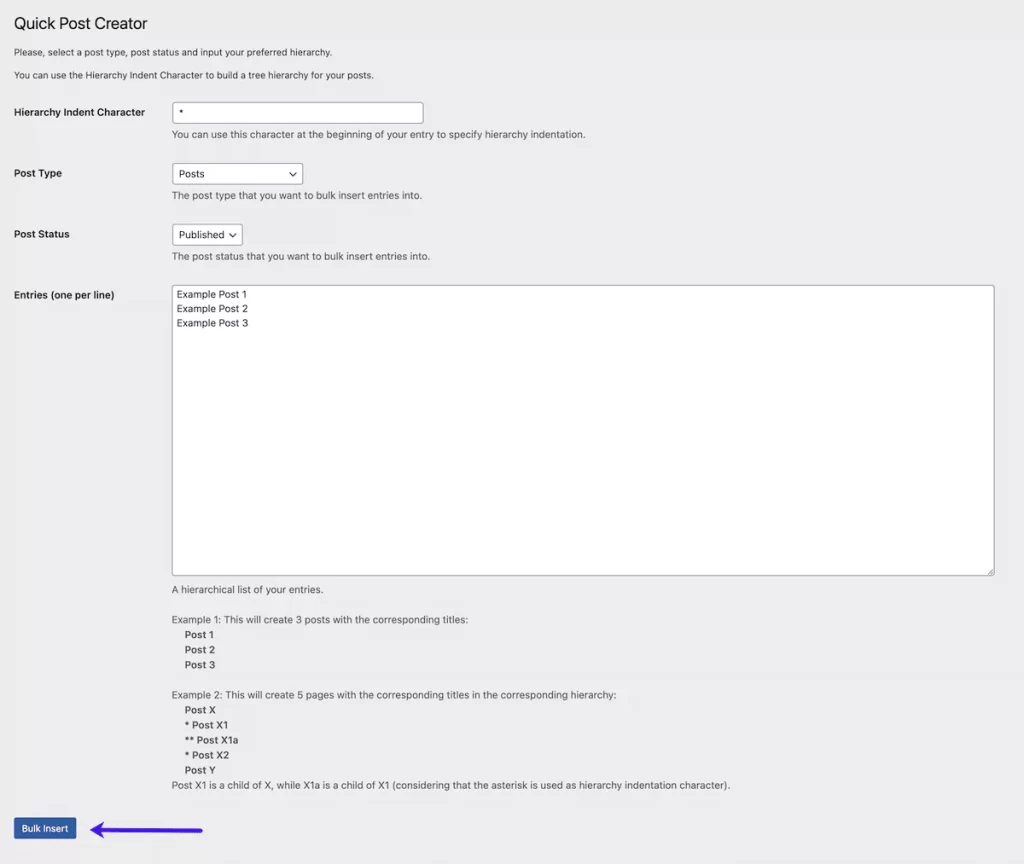
You will find more options in this plugin. For instance, if you are willing to create bulk posts, you will get options like- post type, post status, and entities. Configure those as you prefer. Then click the blue Bulk Insert button at the bottom left of the page.
To ensure the posts are created, go to the dashboard and select Posts. You will find the relevant posts there.

Step- 2: Copy Weebly Contents And Paste Them To WordPress
Once your WordPress page and post are created, it’s time to copy-paste the contents from Weebly. Make sure to paste the contents to the right page; don’t mess up while doing the process. As you are doing this manually, it will take some time. Besides pages and posts, you will also need to transfer the images.
For this, you have to manually save the images of the Weebly site and upload them to WordPress. After getting the images into the library, you can place them on the designated pages.
You need to do this for each and every page. However, don’t forget to update the internal links on your new WordPress site to ensure they are pointed correctly.
Method #2: Automated Migration Using Plugin
Migration plugins are helpful for those who have a large website or don’t want to go through the time-consuming manual process. This automatically exports content from Weebly to WordPress in minutes.
However, the major issue here is that after importing it to WordPress, you may need to adjust the contents and placement. This method may be troublesome if your website is complex and has tons of images and custom posts. In this case, move to the third method, as mentioned in the below section.
However, you may face another issue in selecting the right plugins. There are a wide range of migration plugins available. But you need to check the plugin’s compatibility with your WordPress version. Besides, keep in check if the plugins are updated regularly or not.
If any plugin is not updated for a long time, it may not work perfectly. So, be careful in selecting plugins. But no worries, we have checked all the below-mentioned plugins and researched well before suggesting it to you. Now let’s dive into the automated migration steps-
Step- 1: Import Posts Using The Feedzy RSS Feeds
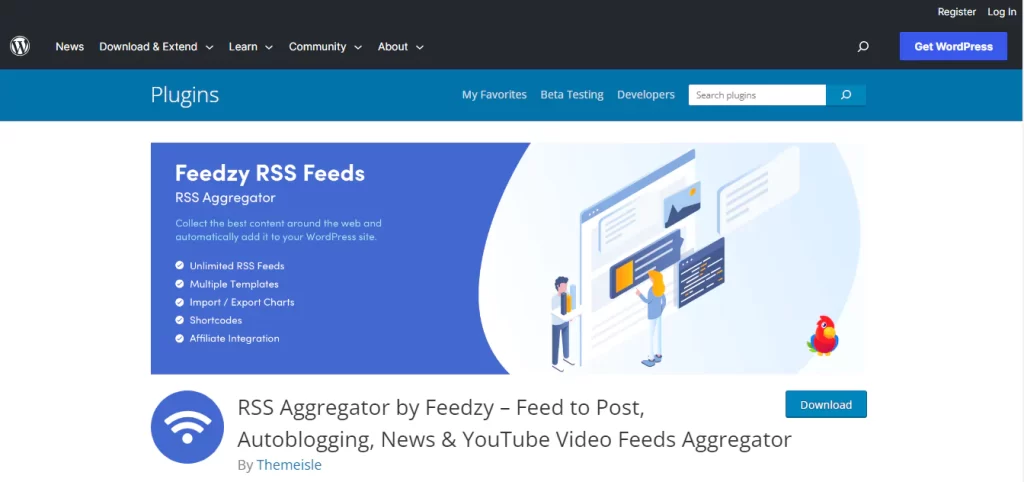
The Feedzy RSS Feeds or RSS Aggregator by Feedzy is a WordPress plugin designed to convert the RSS feed item into WordPress posts automatically. Here is how you will import posts to WordPress using this plugin-
- Install And Activate The Plugin
Go to the WordPress dashboard, navigate to Plugin, and click Add New. This will lead you to the plugin installation section, where you will find a search bar. Type the name of the plugin, Feedzy.
Once you find it, install and activate it to continue the procedure. After activating it, you can now use the Weebly website’s RSS feed to create posts on your WordPress site. We are using the free version of this plugin. If you want advanced options, a paid version is also available.
- Find the “Import Posts” Tab
Once your plugin is activated, go to the WordPress dashboard and look for Feedzy. Now, click on the Import Posts tab.

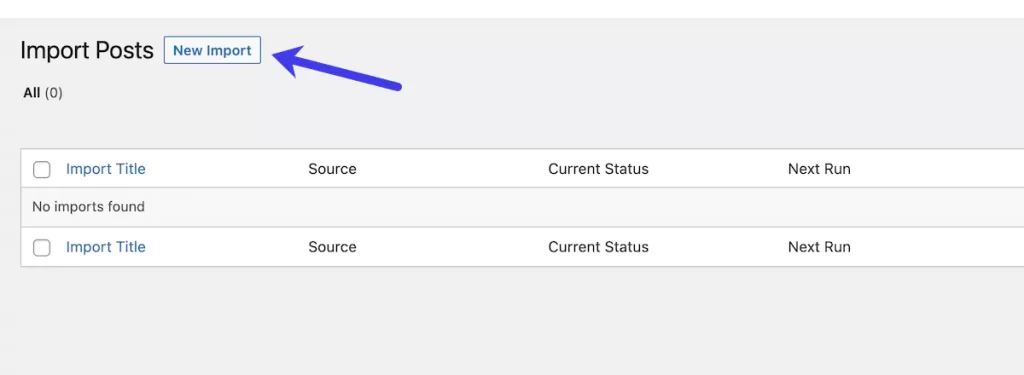
It will land you on a new page. At the top of the page, you will find a New Import button. Click on it to go into the main configuration options, where you can set it up to import RSS feeds to your website.
- Import Posts From Weebly to WordPress
At this point, you are at the main import page, from where you will complete the post-importing process. The New Import page will look something like this-
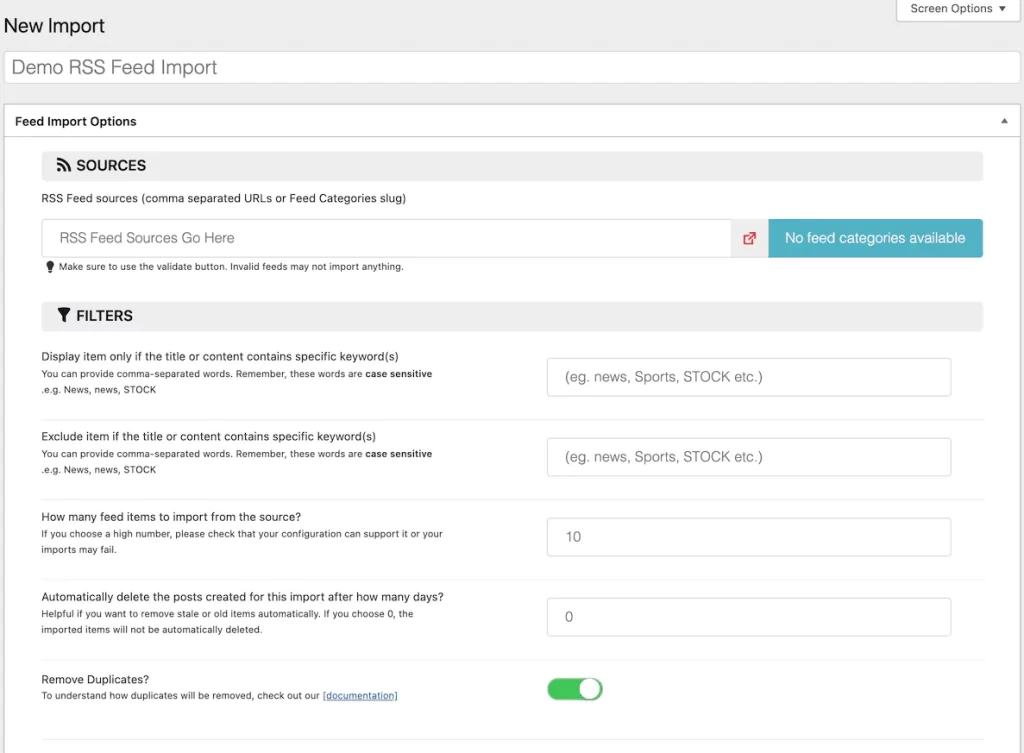
First, give a name to your import; it can be anything relevant to the feed. As you can see in the above image, we have given the name ‘Demo RSS Feed Import.’ Now, in the next field, you will find ‘Source’. Insert the feed URL of the Weebly site directly into this label. Now, from where to get this URL?
Go to your Weebly site, and on the RSS button, your feed will open as an XML file in the browser. It is the feed URL that you are looking for. The URL will look something like this-
- https://www.yoursite.com/1/feed
- https://www.yoursite.com/feed
- https://www.yoursite.com/rss
Insert this link into the ‘Source’ field and fill out other options to configure it as you want. You can also bring in multiple fees one at a time. However, all feed setups will not look the same, as it highly depends on your configurations. Besides, as you use the free Feedzy version, you will find many options unavailable. If you want access to those options, you need to get the plugin’s premium version.
Scrolling down, you will find another field, ‘ASSIGN ELEMENTS.’ This section includes all detail options from your post, such as post type, number of posts, post taxonomy, status, title, date, and more.
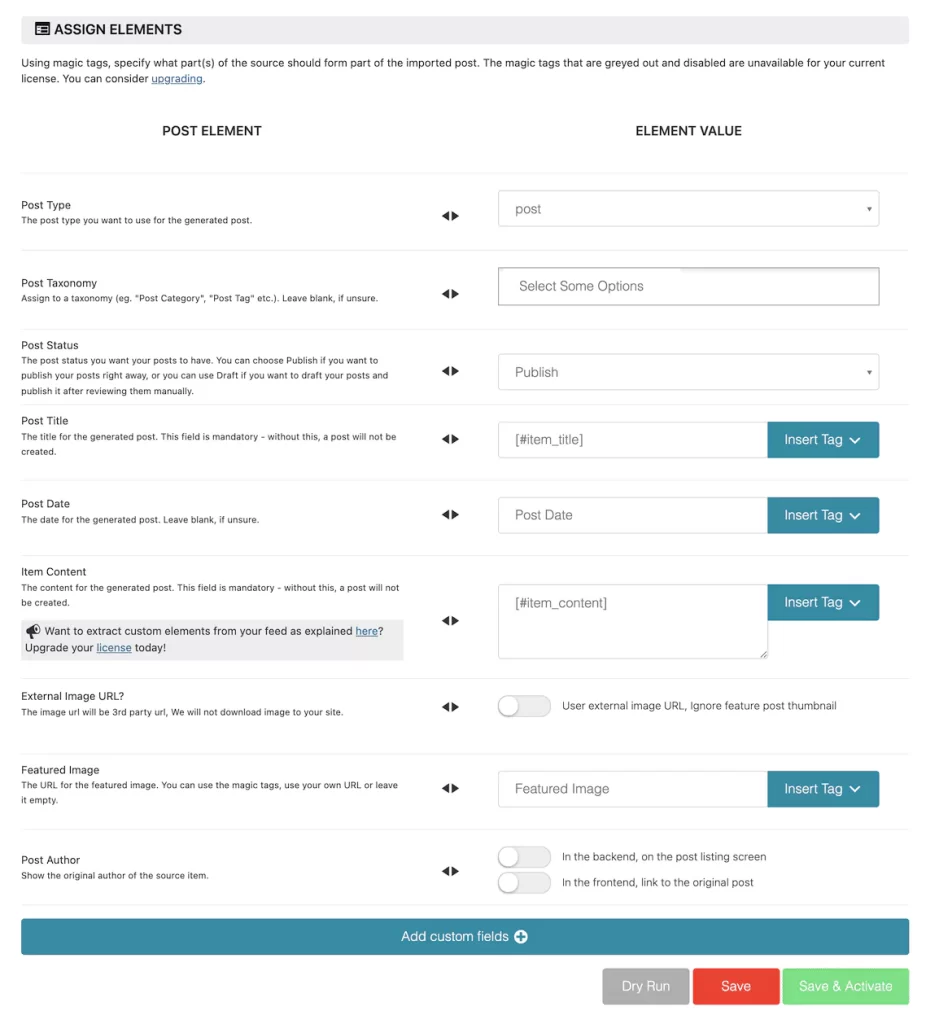
Fill in all the options accurately and scroll down to get the green button ‘Save & Activate.’ Clicking on the button will automatically import the posts from Weebly to WordPress. It will then take you back to the ‘Import Page’ section. There, you will find the imported contents.

Step- 2: Import Pages
The Weebly RSS feed doesn’t include pages; it only supports posts. In the manual section, we have learned how to import pages by copy-paste, which can take time. So, you can use a plugin like HTML Import 2 or HTML WP. Though HTML Import 2 is a popular plugin, this hasn’t been updated since the last three WordPress updates. So, it may not work as expected. In this case, HTML WP is your best option to automate the page-importing process.
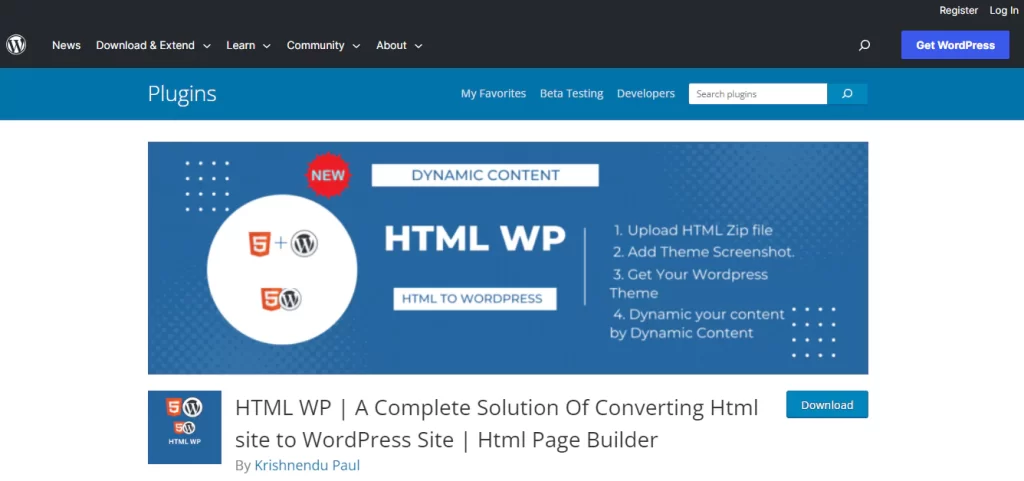
First, you will need to export the Weebly pages as HTML files. You can also ask Weebly to assist you in doing this, but you might have to wait a few days for a response. Once you have exported the HTML files, save it to your computer.
Go to the WordPress dashboard and navigate to Plugin>Add new. Search for HTML WP, install it, and activate it on your WordPress. Using this, you can import the pages from the saved HTML files on your PC.
Step- 3: Import Images
The HTML WP plugin mentioned earlier imports linked image files into pages and posts. Yet, if there is any incorrect linking, you can install and activate the GL Import External Images from the URLs plugin.
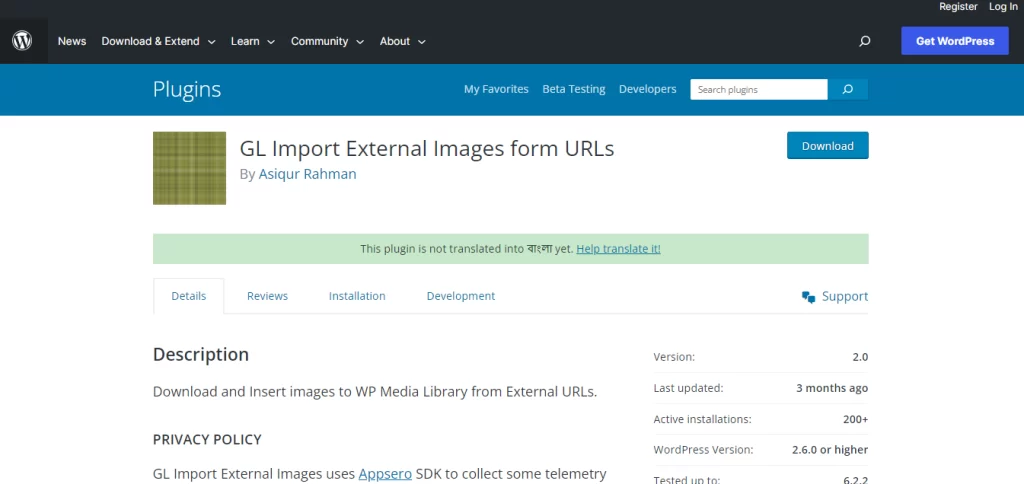
This plugin goes through the source code of the posts or pages and finds the img tags linked to other sites’ images. Then, it copies those images to the WP Media Library from the external URLs and changes the code as necessary. Thus, it will remove the hassle of manually saving and re-uploading images.
Method #3: Outsource the Weebly to WordPress Migration
Outsourcing is the best option if you have a massive website with bulk posts, pages, images, and other content categories. Several websites offer Weebly to WordPress migration services. We have listed the best two options for you-
- CMS2CMS
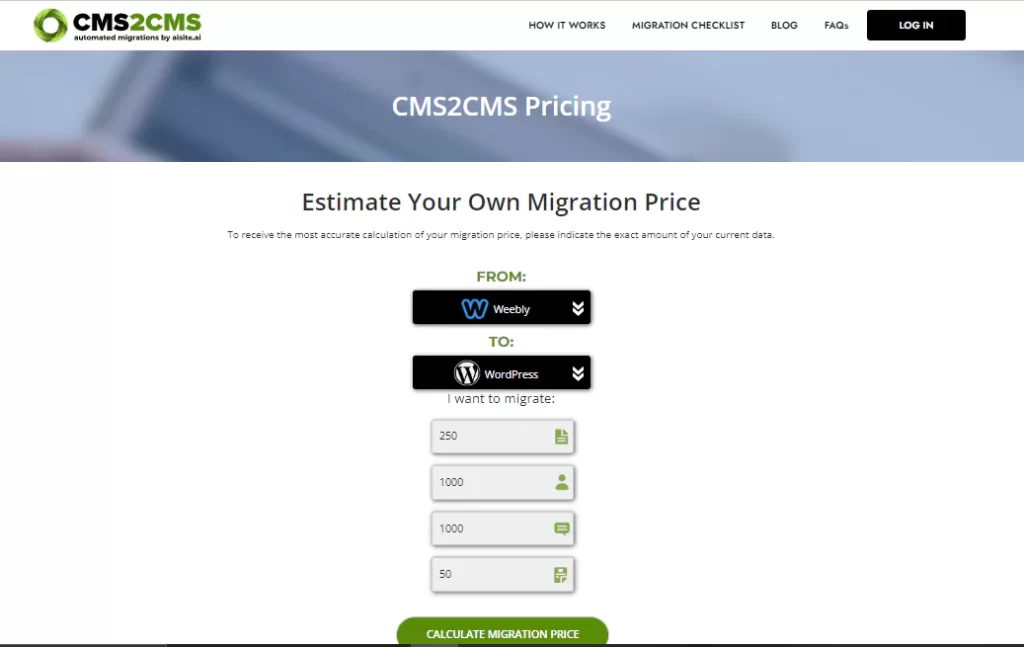
CMS2CMS is a paid service that will help you migrate from Weebly to WordPress without worries. They support all major content management systems for migration. The plus point is that you can set prices based on the number of contents you want to migrate.
Go to the CMS2CMS pricing page, choose Weebly on the option name ‘From,’ and select WordPress for ‘To.’ Then, input the numbers of pa CMS2CMS price calculation pages or posts you want to migrate. And click on the ‘Calculate Migration Price’ button. This will show you the required price of the process.
Step- 1: Run the Demo Migration
After getting a package or setting the pricing, you will need to run a demo to check if the service works perfectly. With this demo, CMS2CMS will migrate ten pages, including all images and other items, to let you test if it really works. This is how you run the demo migration-
- Enter the URLs for the source and destination sites.
- Confirm the CMS types as Weebly to WordPress.
- Select if you want to add any extra migration options; these include: Image or media migration, making the URLS SEO friendly, If you want to delete the existing WordPress data, clear the current target data, choose a theme from design suggestions, Redirect URLs.
- Click Start Migration.
Step- 2: Run the Full Migration
If you are satisfied with the demo migration, you can proceed with the actual migration. Even though there isn’t any practical assistance offered for the DIY migration from CMS2CMS, you may get migration insurance that will let you retry the transfer if things don’t go according to plan.
However, if you want a completely automated process, you can buy a premium full-service package. Their premium pricing starts at $299, which allows you to migrate your large Weebly websites to WordPress in minutes.
- WordHerd
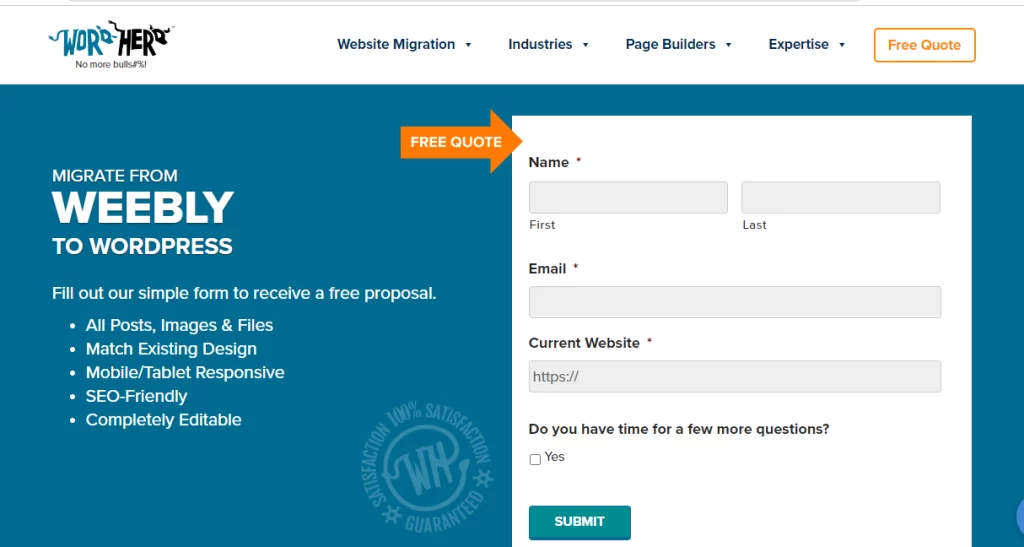
WordHerd is another amazing choice for outsourcing your Weebly to WordPress migration. Doesn’t matter how big your website is; you can import all its content directly to WordPress by their service. Once you get into their official website, you will be offered a fee quote form.
You can receive a free proposal by providing some basic information like your name, email address, and URL of the current website! This includes migrating all posts, images, files, design choices, SEO features, and more.
Post Migration

After completing the migration process, you will have all your content on your new WordPress website. But there are many things that you need to set up; these include the design of the site, links, domain pointing, adding extra features by using plugins, and more. No worries, we have listed all the essential setups for you-
Step- 1: Select A Customized Theme
As your migration is done, you will find all Weebly content on your new WordPress site. But unfortunately, you can’t import the theme. Here, the biggest advantage of outsourcing the migration process with CMS2CMS or WordHerd is that they will set your theme as per your previous Weebly theme. So, in your new site, you will not have to move around to select a similar theme to keep your site’s appearance intact.
Never mind, WordPress is known for its wide range of themes. You will find thousands of options to choose something similar to your previous theme. You can search on the WordPress Theme Store to get 11,338 free themes! Besides, there are also wide marketplaces that sell themes. Select the one that matches your website requirements and customize it per your needs. But whatever changes you bring, keep it similar to the previous site. The previous or regular visitors should not feel alienated when they visit your site.
Step- 2: Setup Permalinks
The URL format of Weebly is different from WordPress. For the Weebly website, the URL structure of pages and posts is as follows- the URL structure is something like this-
For blog posts: http:/mysite.com/blog/your-post-title/
For pages: http://mysite.com/page-title.html
As you can see, the URLs of the Weebly pages have “.html” in the end. However, the default WordPress structure doesn’t support such a format. As a result, when any visitor clicks on the old URLs, they will see a 404 error page. But there is nothing to worry about; this is simple to fix. However, you need to follow two different ways to set up the permalink of posts and pages; these are as follows-
- Setting Permalink For Posts
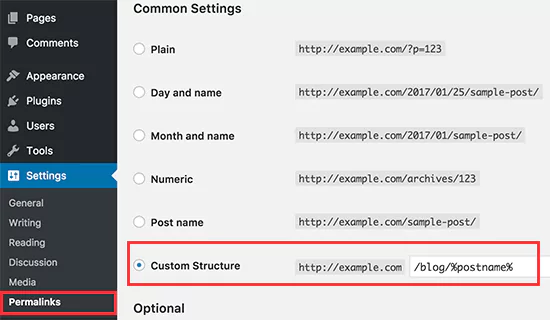
Navigate to your WordPress dashboard and go to Settings>Permalink Settings. In the top field, you will find a Common Setting option. Select Custom Structure and enter “/blog/%postname%” in the text field. Click on the Save Changes button to update the links.
- Setting Permalinks For Pages
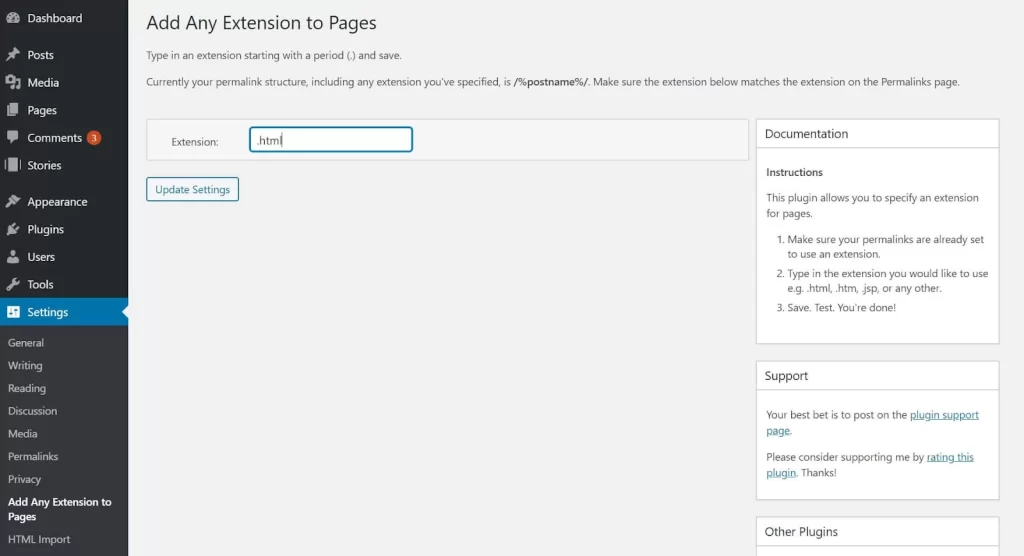
The above process will fix the permalinks of posts, but to add the .html extension for setting the link of pages, you will need a plugin. Add Any Extension to Pages plugin is our recommended option for you. Install and activate the plugin and move on directly to the WordPress dashboard.
Go to Settings > Add Any Extension to Pages. This will open up the plugin where you will get access to it. In the Extension text field, type ‘.html’ and click on Update Settings. This will update all the permalinks of your WordPress pages.
Step- 3: Setup Redirects & Point Your Domain
Once you are happy with the content migrations and link setups, it’s time to point your Weebly domain to WordPress. Now, the process will be different for a custom Weebly domain and one with a subdomain URL; both are as follows-
- For Subdomain URLs on Weebly
If you are using a subdomain URL on your Weebly site that appears something like this- http://example.weebly.com, follow the below process-
- Login to your Weebly dashboard.
- Click on Settings.
- Navigate to the SEO tab.
- Scroll down to the header code option.
- In the header code text field, type the following code:
| <meta http-equiv=”refresh” content=”0;url=http://www.yourdomain.com/”> |
NB: Your new WordPress site’s domain name should be replaced with yourdomain.com.
- Click on the save and publish buttons.
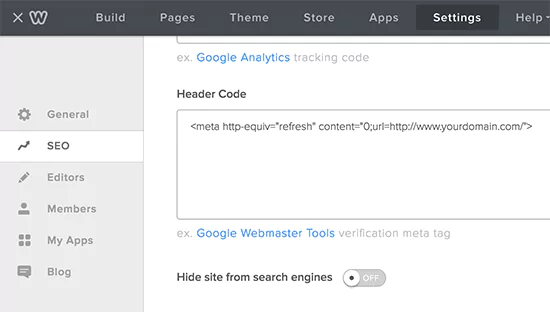
If you go to your Weebly website right now, it will update and redirect to your WordPress website. When the transfer is finished, WordPress can be configured to use your domain rather than the temporary one you initially set up.
- For Custom Weebly Domain
If you have a custom Weebly domain that looks like- mysite.com, then you will need to point it to a WordPress hosting provider. For this, you will need the nameservers of your WordPress hosting provider. Go to your hosting control panel and navigate Domains>DNS to find nameservers. Note it down and move to the Weebly account.
Login to your Weebly account and navigate to the Domains page. Select the domain name you want to change by clicking. Now, go to the domain settings page right away and select the change button. On the next page, you must enter the new WordPress host’s nameservers and click the Save button to store your settings.
The changes in the nameservers will take some time to spread throughout the internet. However, visitors can see your WordPress site as soon as the task is completed.
Step- 4: Setup Any Other Features
Once your WordPress is well set up, you can now concentrate on adding more features. For instance, you can add forms, popups, sliders, gallery, and more. You will get all these using WordPress plugins. Besides, check the Weebly website to see if you want to carry over any feature from there.
Step- 5: Test Site
Migrating your Weebly site to WordPress isn’t an easy process, especially when you do it by yourself. So, testing your site is mandatory. Check out the images and posts to ensure they are in the right place. Invest more time to test the links, forms, and widgets to ensure they work perfectly.
If you have migrated manually, don’t forget about broken link issues. In this case, use the Broken Link Checker plugin to check all posts and pages and find the broken links. After successfully testing your site, opt for optimizing your new WordPress site.
But how to do that? Check this to get your ultimate solutions – 8 WordPress Website Optimization Techniques.
The Closing Lines
Following the above process, you can easily migrate from Weebly to WordPress. However, manual migration is okay if you have a small page containing a few pages. But for large websites, either go for automated processes or seek help from outsourcing services like CMS2CMS.
Though you will need to pay a good amount, it will make the migration accurate and hassle-free. Once you are done with the migration, set up your WordPress properly and emphasize search engine optimization to boost the visibility of your new WordPress website.
However, if you face any problem while indexing the WordPress pages, check this- Common Page Indexing Issues and Its Solutions.

